
About This Recipe
For some, a bread recipe that requires extremely minimal effort is the ultimate goal. Who cares about perfection? I just want bread! This recipe is just that – minimal effort, moderate results. I wanted to make this recipe stupidly simple, so that those who do not have the time, effort, or desire to slave over their loaves all day would have something to turn to.
Let me be clear – this is not me. I’d much rather take the two minutes every hour to fold my dough and to meet all of its needs so that I can have my perfect loaf: one that is tall and defined, bursts in the oven, and presents a wide open crumb. As of the time of this writing, I am still searching for this recipe, though I get closer with every bake.
However, I also seek to meet all the needs of the sourdough community. And, for many, that is minimal effort. I respect that. We do not all have a sourdough obsession: we just want to make good bread.

So, let us do just that. Make bread. And, let me tell you about the “why’s” behind everything you will face here, so that you really understand what is going on.
What Is Country Bread?
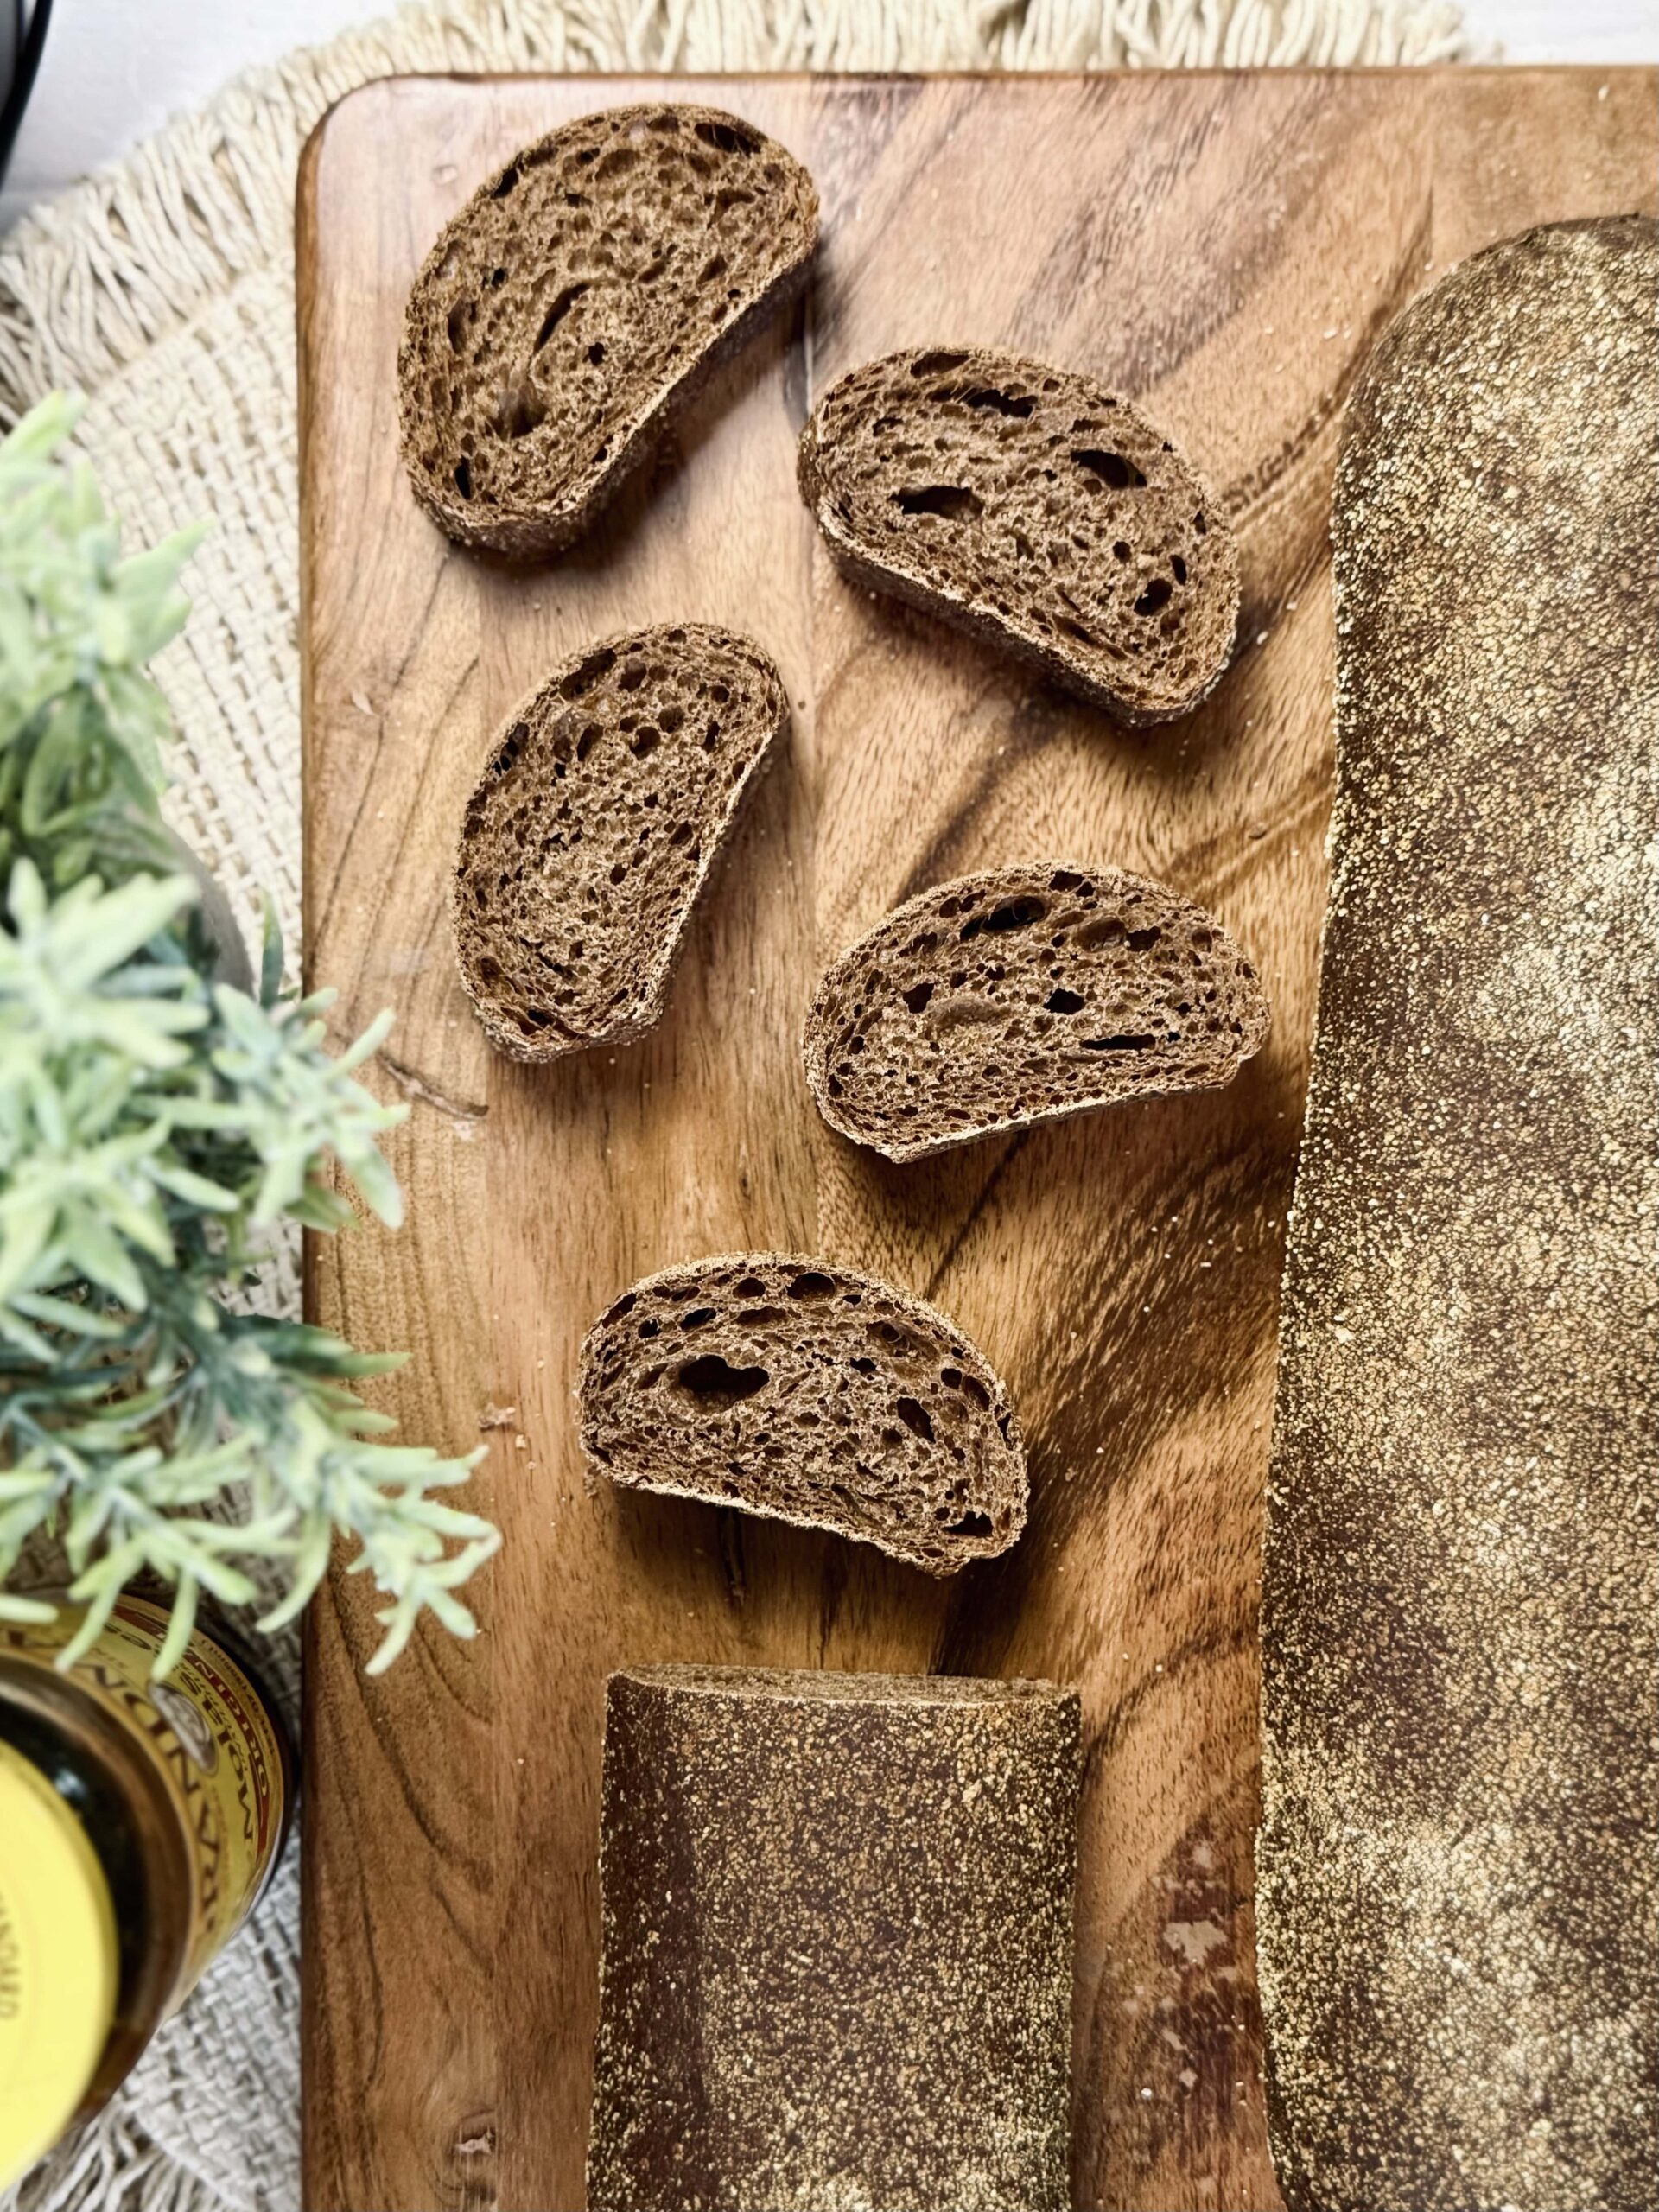
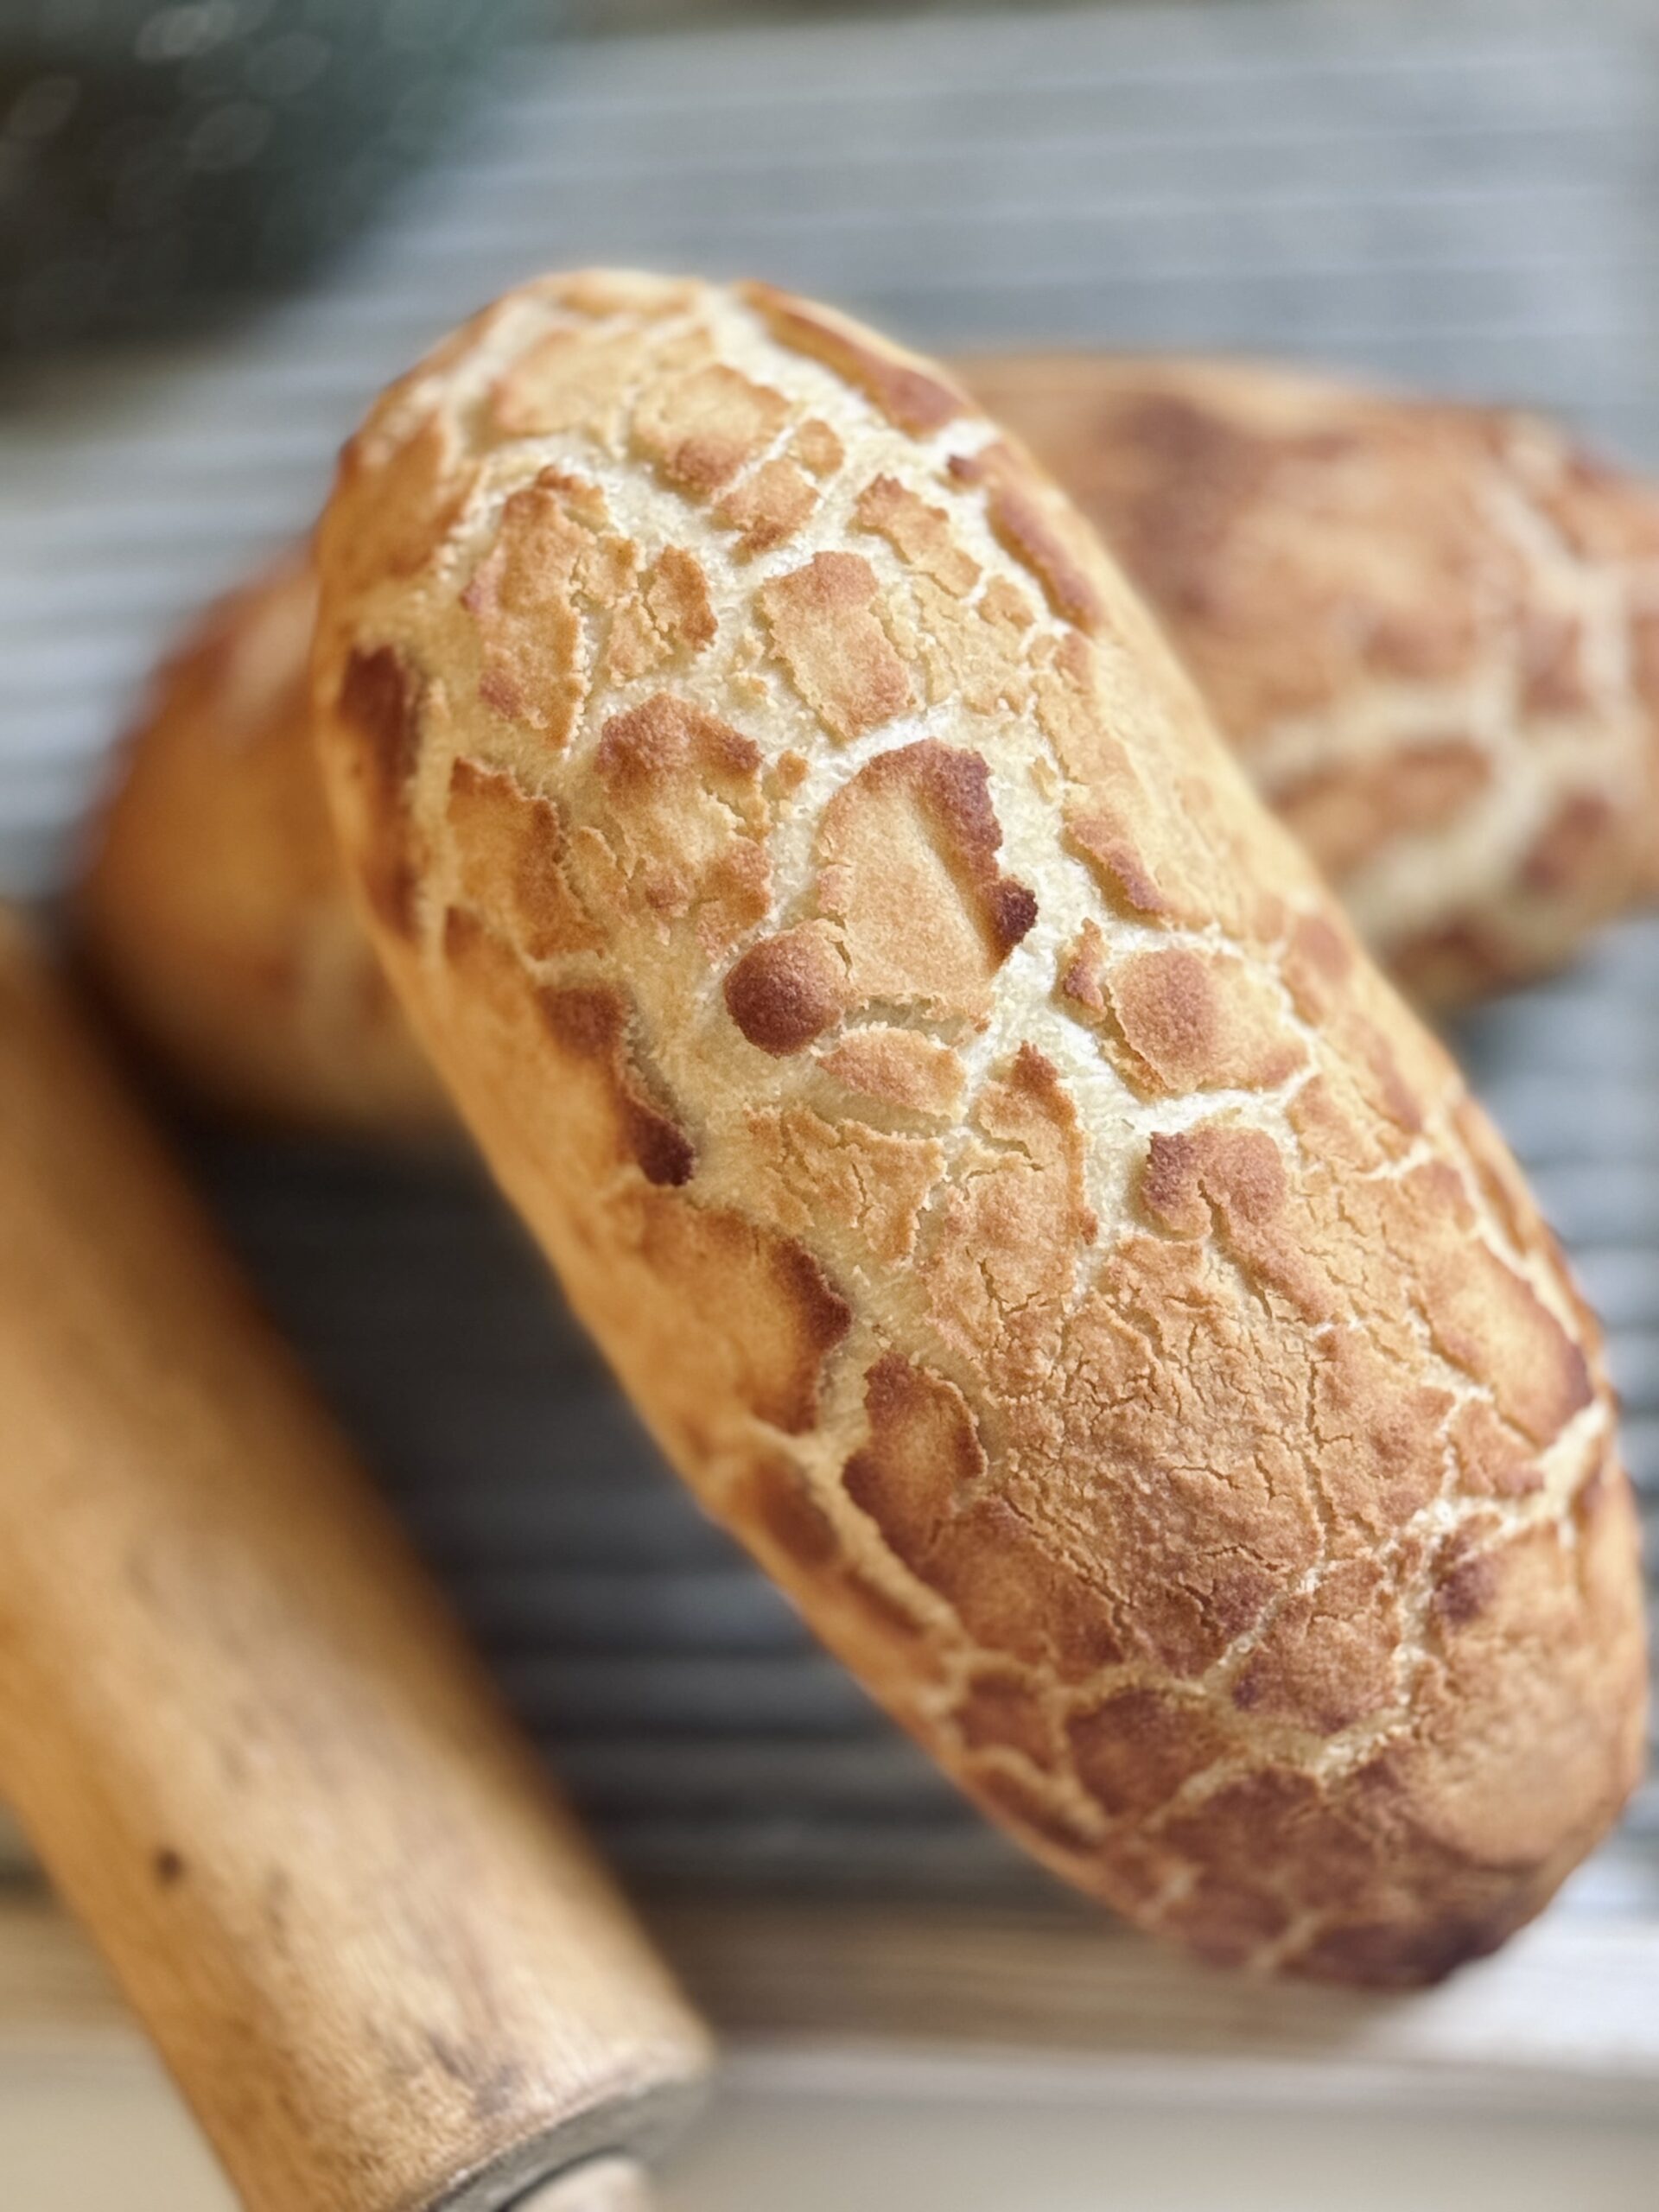
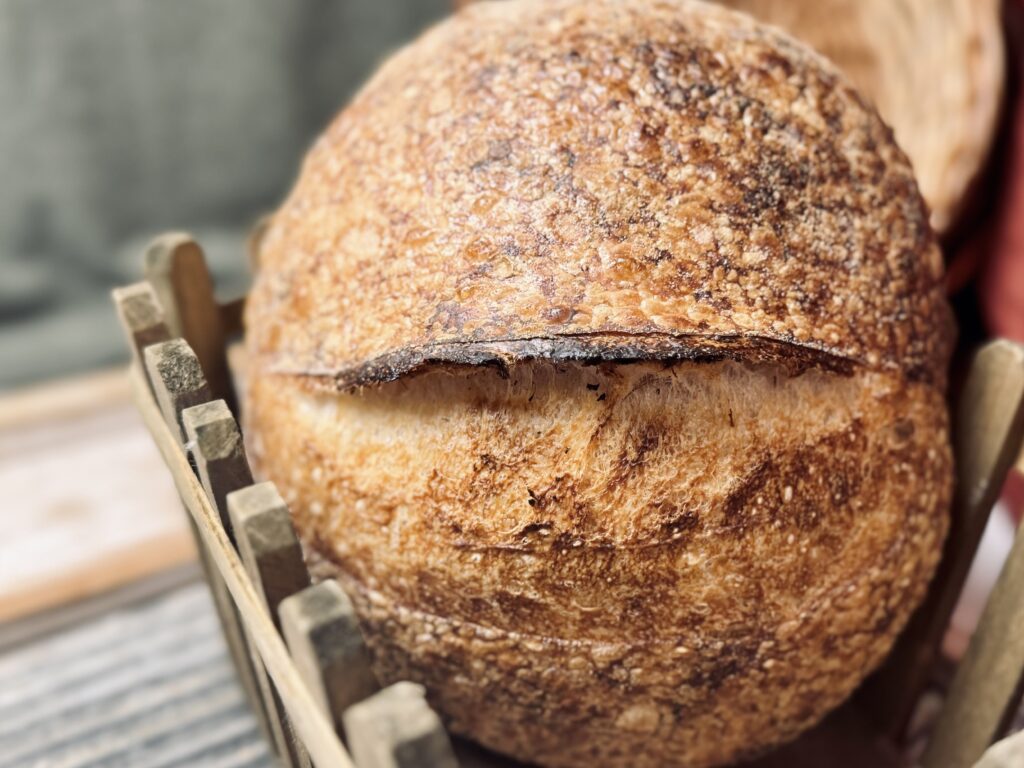
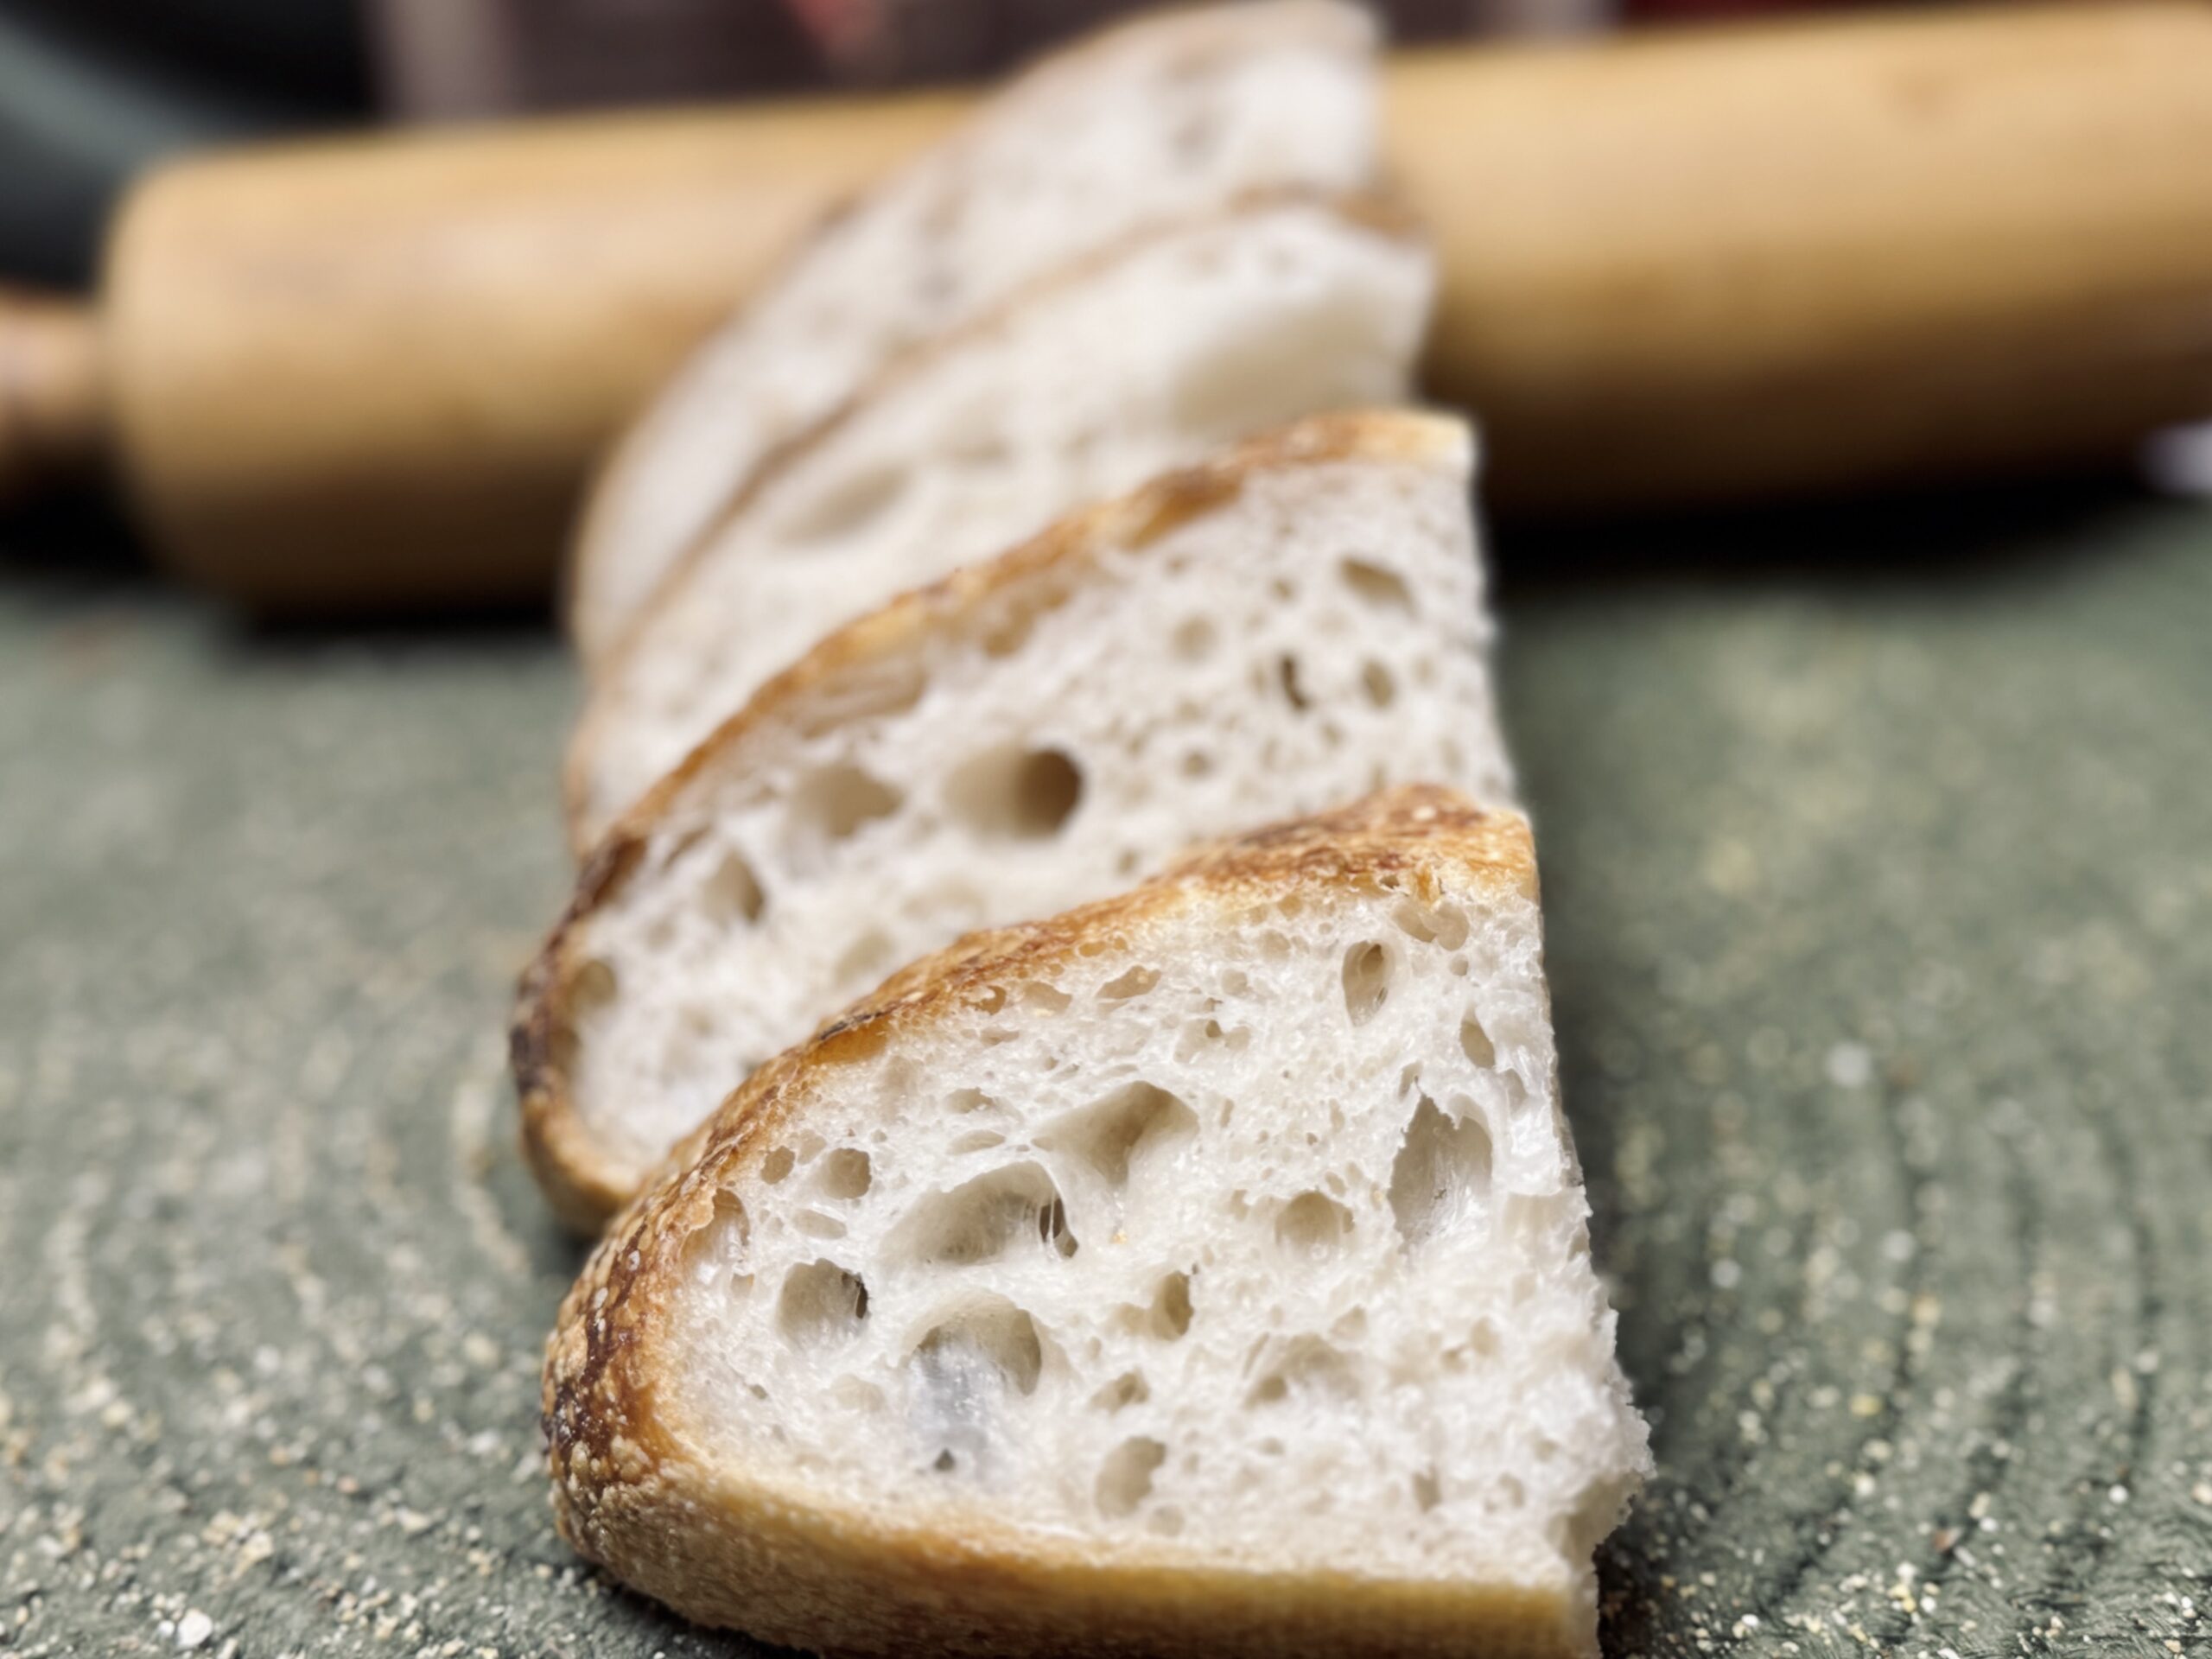
Country bread is a French-inspired rustic loaf of sourdough bread. It can be shaped into a boule (round) or a batard (oval). This is the bread that most people simply call “sourdough” today. This bread was popularized in the early 2000’s by Chad Robertson, whose book, Tartine Bread, is the root for which all modern sourdough is based today.
This type of bread can be made with a variety of flour types for different flavors and textures. For this recipe, we will stick with the simplest version, using just the most basic ingredients: white flour, water, salt (and sourdough starter). And, very unlike the original, we will use our stand mixer to do the bulk of the work for us.
What I Love About This Recipe
Twenty minutes. That is all you need. Twenty minutes and you have (well, actually your stand mixer has) done most of the work. There is no coming back and checking on the dough, unless you are so inclined. Ferment it, shape it, bake it, and you have sourdough.
All The “Why’s”
Flour Choice
I almost always use bread flour in my leavened bread recipes. The reason can change, depending on the type of bread I am making, but I almost always fall back to bread flour for one reason or another. In this recipe, gluten is developed in a stand mixer, which means that we must take into account a few important things about this type of bread and how it comes together in a stand mixer specifically.
My main reason for using bread flour in my artisan bread recipes gluten-forming proteins. This is very important in hand-mixed dough, which comes together naturally through fermentation. Without bread flour, the gluten does not come together as quickly or as strong, leading to a weak dough that is overly extensible and readily loses air.
This same concept applies to bread mixed with all-purpose flour in a stand mixer, but in a different way. With all-purpose flour, the dough takes longer to come together during mixing, just like it takes longer to come together naturally over time. Longer mixing times have their pros and cons, the biggest drawback being the incorporation of oxygen into the dough. While oxygen incorporation is necessary, it is a good thing only to a certain extent. Too much oxygen in bread dough is called “over-oxidation” and it produces a very white bread with a bland taste and closed crumb. This was the reason for Calvel’s invention of autolyse, which allows gluten to come together naturally before mixing begins, meaning mixing times are significantly reduced, even when using weaker flours.
To counter a weak flour without autolyse, we can simply add more flour. Adding more flour also has its pros and cons, but we must do what is best for our bread with the flour we are working with. The choice is yours: use a strong bread flour that comes together easily during mixing, or use a weaker all-purpose flour that might require additional flour or need to be mixed for longer. You might even choose to meet in the middle with a quality brand of all-purpose flour.
Salt
Salt helps bring out flavor (without salt, bread would taste almost like nothing), but also has notable effects on the dough. Salt is a tightening agent, meaning it helps create a more elastic (strong) dough. This is important in a simple, stand mixer recipe, since we do not want to have to come back to the dough until it is time to shape.
Salt does slow fermentation, as well as gluten development, but these are things we must account for in the recipe because we cannot have a recipe without salt. It is important to use just the right amount, enough to bring out the flavor, but not so much that the loaf cannot ferment or come together. I use the standard – 2% salt – in all my recipes, including this one, unless otherwise noted.
Hydration
For this recipe, I take down the hydration a bit since we do not need a dough extensible enough for folding. Since the plan is to not have to come back to the dough, we need to create enough structure through the proportions of each ingredient and through mixing. The more water in a recipe, the looser the structure, and the more times we have to come back and fold the dough to boost productivity during fermentation.
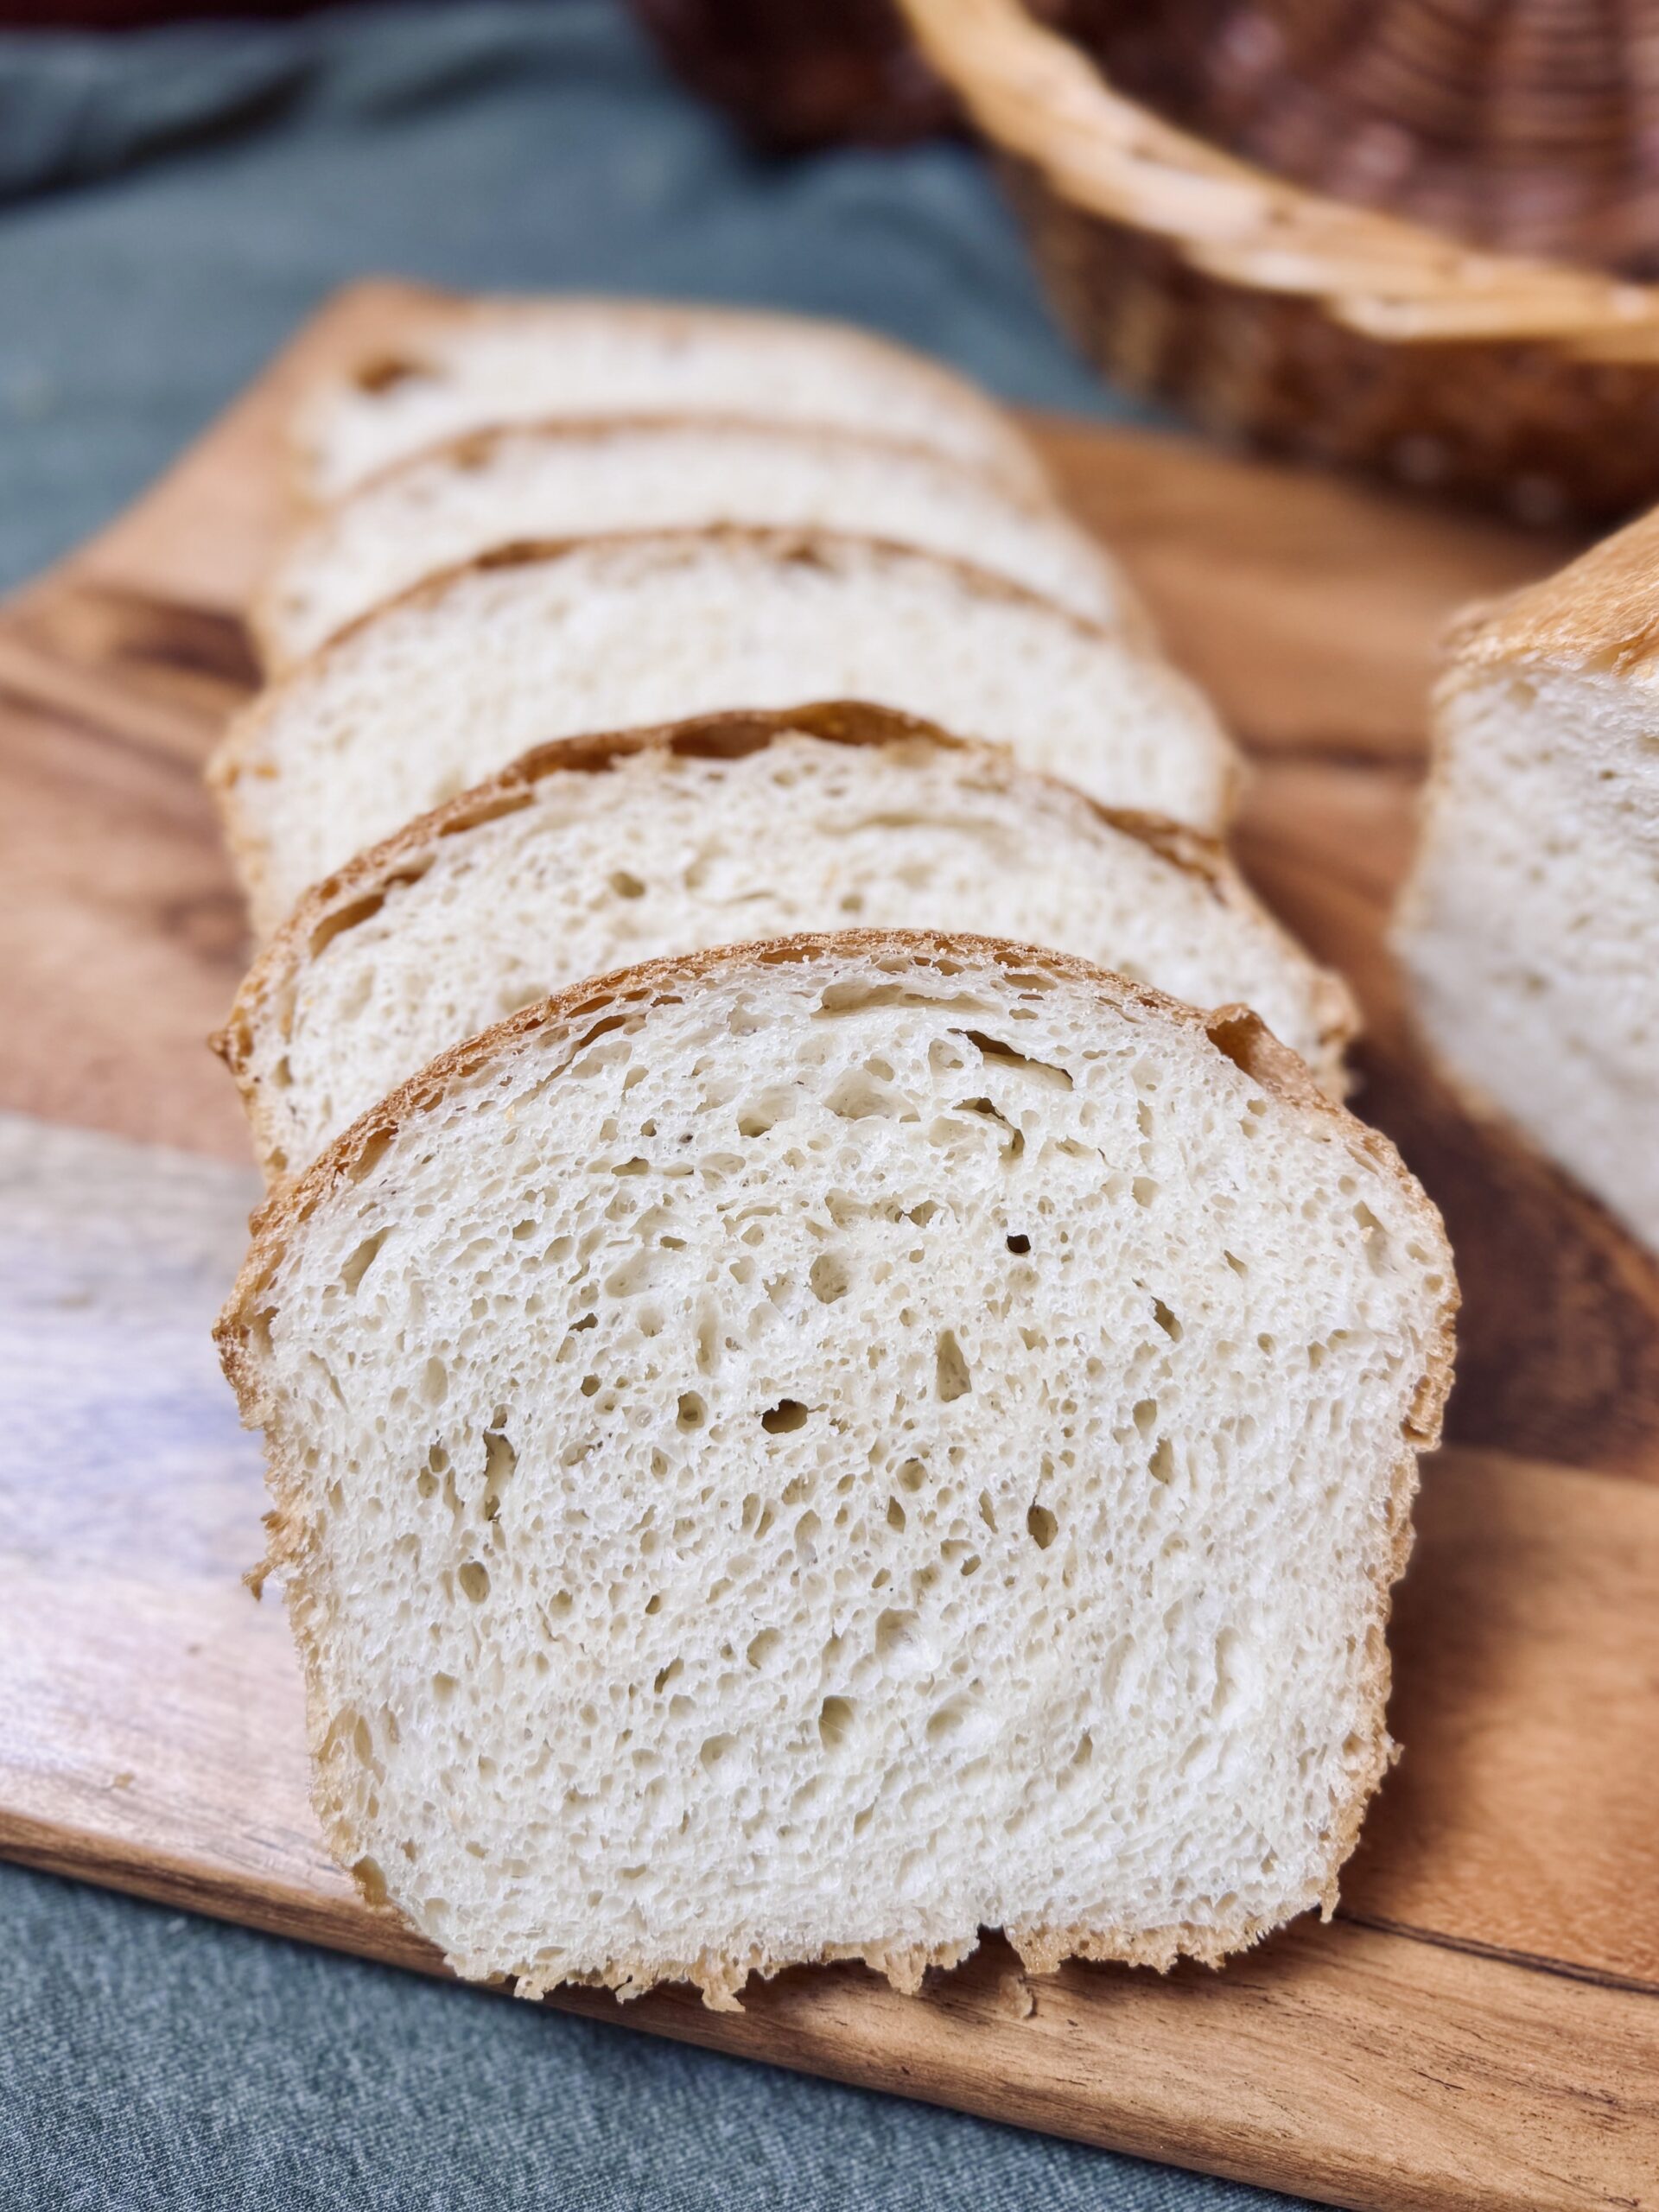
This recipe has an approximate hydration of 70%. It could even go down to 65%. But, beware! Balance is needed. While too much water means too little structure, too little water means strained ability to form gluten. Without gluten, the dough loses air and the loaf cracks. We have to have just the right amount of water for gluten to be able to form and for our dough to still stand tall on its own (without folds). 70% seems to be the perfect balance, creating a moderate hydration dough with these characteristics.
Mixing
All of the dough and gluten development in this recipe is done in a stand mixer. That makes mixing the most important component, aside from fermentation. While simple, a little knowledge can go a long way in helping us achieve the characteristics that are desired in a loaf of bread.
The goal of mixing is to incorporate all ingredients and to develop the gluten network, including the right balance of elasticity (strength, the loaf’s ability to stand tall and hold its shape) and extensibility (flexibility, stretchiness, the ability of the loaf to expand during fermentation and have a massive oven spring). Incorporating the ingredients is easy, and can take two minutes or less. But, if we just did this, we would still need to come back and structure the dough as it ferments, otherwise the loaf would be flat with a dense crumb: majorly underdeveloped. Trust me, I tried this and failed miserably, more than once. Dough and gluten development are essential to success, and we must do this properly in the stand mixer.
Extensibility
When you hand-strengthen a loaf of bread, extensibility is desired. It helps the loaf to be folded and structured properly throughout fermentation. Since we are not going to be touching the dough from mixing until shaping, it is actually better not to strive for excess extensibility. The dough will naturally relax through fermentation, which will give us all the extensibility we need for shaping and a good oven spring.
Extensibility (flexibility, stretchiness) is developed through increased hydration (more water), autolyse, weaker flour, or higher mixing speeds. Did you catch that? Higher mixing speeds are not bad, but they do create a more extensible dough. This extensibility is desired in some recipes, for example enriched doughs, especially milk breads, that we want to spring up more in the oven after a long fermentation. But, in a simple loaf like this, not so much.
Maybe you are wondering, “How do higher mixing speeds increase extensibility?” Maybe you thought it was the opposite, as I once did. Less mixing = a more relaxed dough = more extensibility. Too much mixing = a tense dough, which risks breaking apart the gluten completely. This is not so. You see, extensibility is a sign of weakness in bread dough, even though it is a necessary component of bread-making. Autolyse creates extensibility because important proteins are being degraded over time. Faster mixing speeds create extensibility because the gluten is being whacked around and broken when the dough is mixed more aggressively. You can choose how much extensibility you want in your dough by 1) knowing your flour and 2) choosing your mixing speed appropriately.
Mixing Speed
You can see in my original Stand Mixer Sourdough video on YouTube (also linked at the end of the recipe card), that I chose a higher speed to mix my dough. There are several reasons why I chose to do this. Let’s talk about them and what effects they caused.
My goal with the recipe I published on YouTube was to mimic a hand-strengthened loaf of sourdough country bread. My original thinking was that the amount of water was a key component in mimicking this crumb, so I chose to keep the amount of water the same. This meant my KitchenAid struggled to pick up the dough, which lead me to counter this by using higher speeds. Otherwise, the dough would take a very long time to come together (minimum of thirty minutes), and I might as well have just done the whole process by hand.
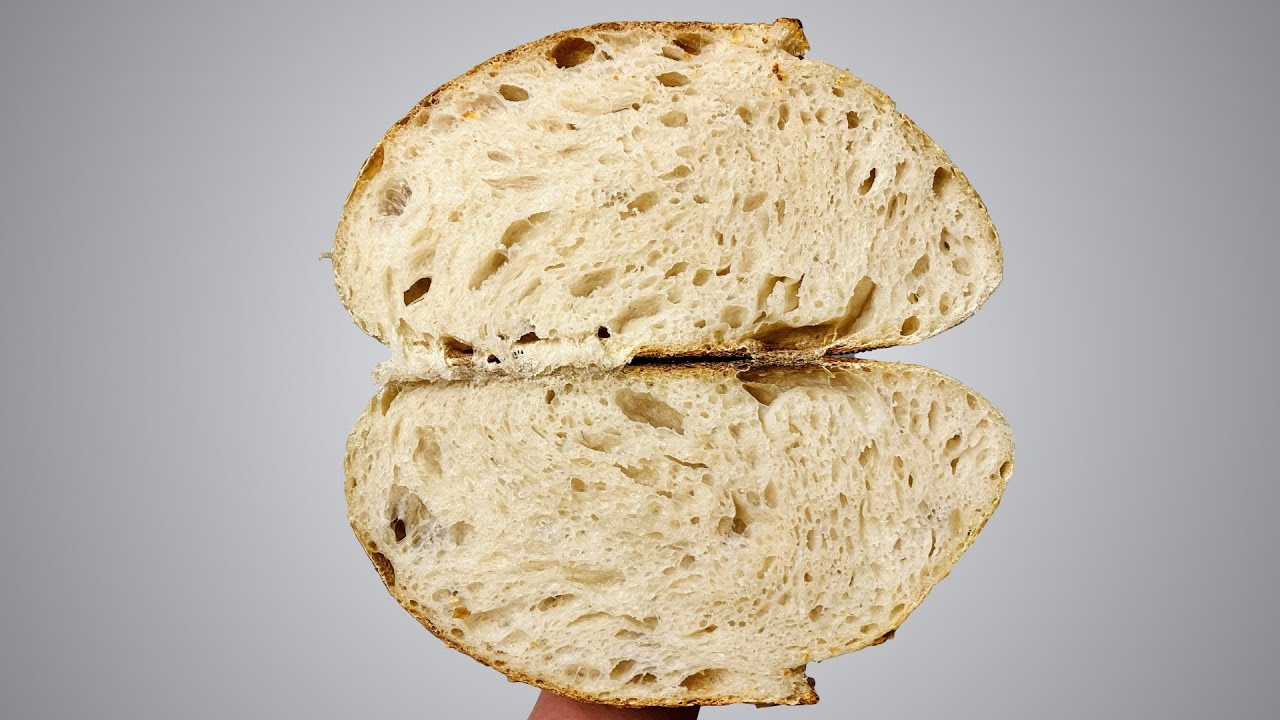
Using higher speeds helped me to be able to keep the hydration I wanted, without excessive mixing time. I was able to achieve a windowpane in a maximum of fifteen minutes. The dough fermented well-enough, was structured enough, and still produced a semi-open crumb.
Notice in the video how I struggled to judge fermentation. I folded the dough to help me keep my usual timing, and even in the end the dough still had not risen as much as I thought it should have. I could not answer this then, but I can answer it now. The gluten structure was too weak, too extensible. That dough needed the fold in the middle and it needed the lamination during shaping to present the minuscule amount of success that it did. Those things build strength (elasticity) which counters extensibility. Maybe this dough still needed folds just like what any sourdough baker usually does when mixing by hand. But, because whacking the dough around breaks gluten bonds, I do not think that kind of extensibility was ever going to be able to be fully fixed. Without a strong gluten network, fermentation cannot properly occur. This, my friends, is why I believe my fermentation was out of whack.
Different mixers have different speeds, and you can choose your speed according to your own personal preferences, based on to how your mixer functions and how your dough performs during fermentation. Our goal is to not have to come back to this dough and fold it. So we need to find some sort of balance that works with our dough, our mixer, and our process goals. We still need extensibility, we just do not need too much of it.
How To Accomplish Our Mixing Goals
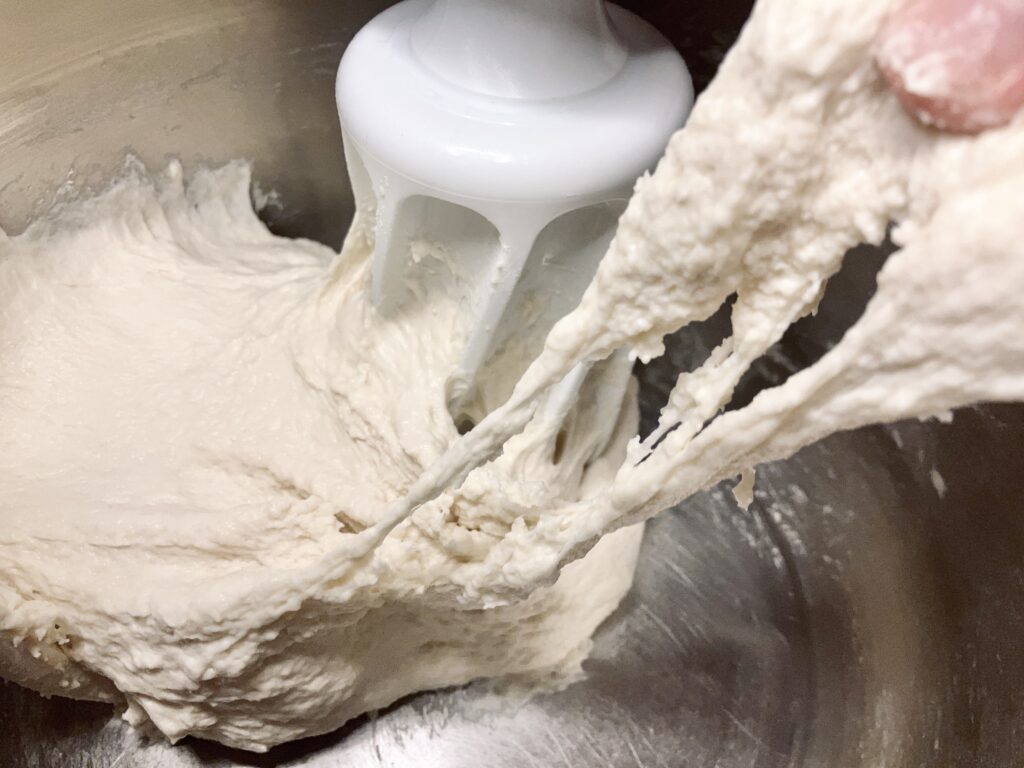
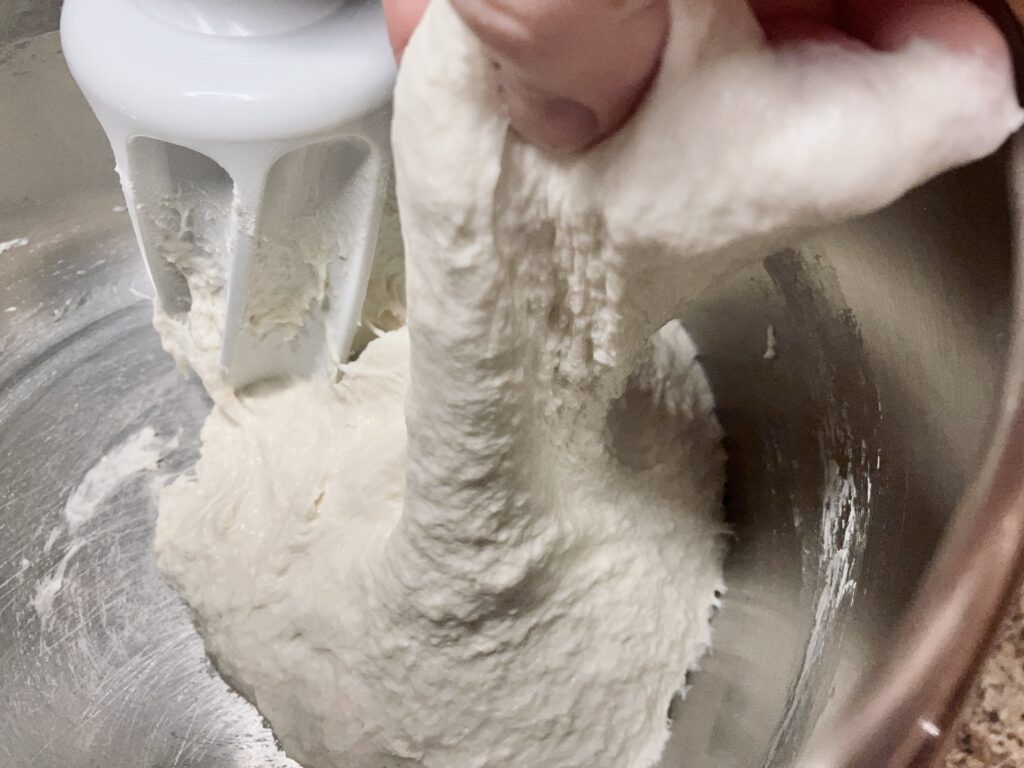
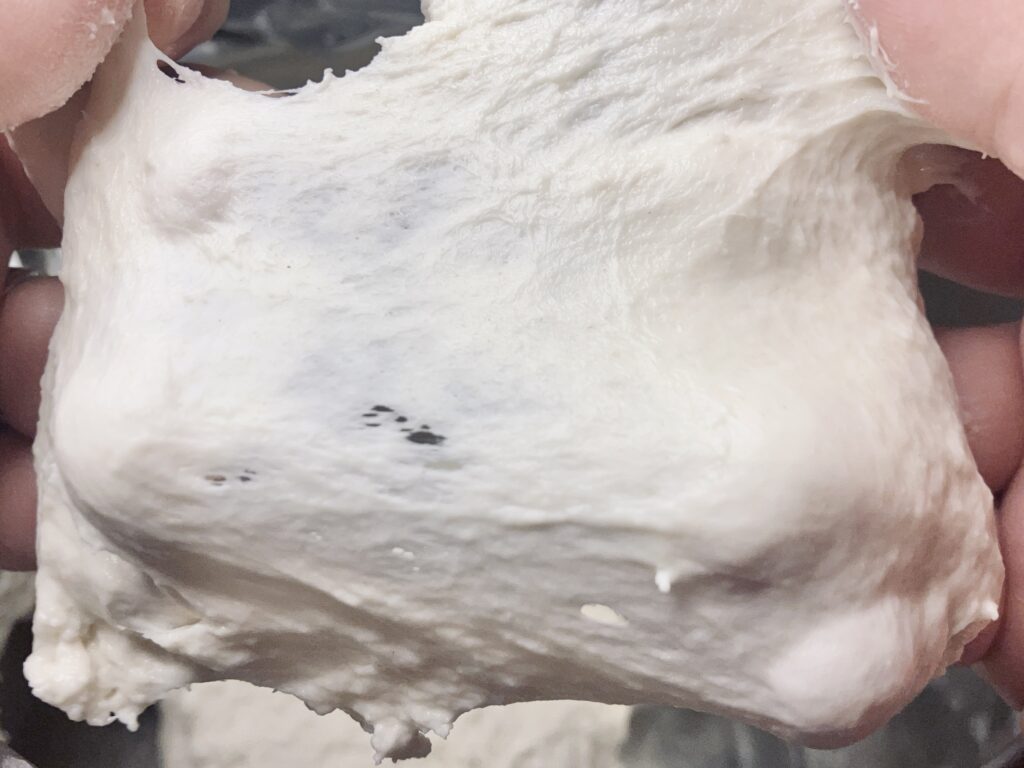
During mixing, we want to develop the dough to medium development. Your dough should have a rough, but not complete, windowpane. Your dough will gain more strength during fermentation, so we need it to be just extensible enough to be able to expand, but not so extensible that the gluten structure is too broken (over-mixing), or that we need to help it out later with folds (under-mixing).
Start by mixing the dough at a low to medium-low speed until the ingredients are incorporated. This ensures everything is combined before gluten begins forming, that way the gluten can develop evenly and efficiently. Next, mix the dough at a slightly higher speed, medium-low to medium, until you can pull up on the dough without it tearing. This tells you that your dough may be ready to ferment.
Stop the mixer and check the windowpane. You want the be able to see through the dough only slightly. It should still have some dark patches (not see-through) interspersed with clear (see-through) dough. It should still tear when stretched excessively. If you can check both of these boxes, the dough is ready to rest and ferment.
Other Considerations
The Flour/Water Balance
Another important component to this kind of recipe is flour, which is discussed above. Different flours will perform differently during mixing. I kid you not when I say that every single flour needs to be worked with in a completely different way. This recipe is made for a 100% white flour bread, the choice being between the quality of proteins in the flour. Cake flour is out of the question, so the choice is between all-purpose flour and bread flour.
Since we are not building structure through folds, using more flour (or less water) is okay. Flour provides structure, we just have to make sure there is enough water that gluten can properly form. It is all about balance. Again, the dough needs to have enough moisture that it can stretch, but also needs to be stiff enough that it can hold itself firmly without requiring folds.
Oxygen
Mixing incorporates oxygen. While oxygen incorporation is necessary and good, too much can cause things to get out of whack. This is why too much mixing can lead to a closed crumb, white color, and bland taste. It is better to add more flour to help the dough come together than to mix for longer. Either way will result in a closed crumb, so you might as well add the flour and keep the taste, texture, and better fermentation capabilities of perfectly mixed bread.
Bulk Fermentation
This loaf is easy to ferment because it does not require any folding. Watch the dough until it doubles in size, then shape. Unless you use the fridge for the final proof, that is. That is where things could get complicated.
Warmer dough continues to ferment a considerable amount in the refrigerator. Colder dough does as well, but to a much lesser extent. It is all about the time it takes for the dough to cool off to the temperature of the refrigerator. In that case, I can provide you with some guidelines on fermentation. Always watch your dough and do your best to read your bread once it is baked and make necessary adjustments for your next attempt.
Generally, loaves that ferment around 70 F (21 C; this is the temperature I ferment my dough) take about 12 hours to bulk ferment (the time from mixing to shaping). Colder climates, say 65 F (18 C), take a very long time, a minimum of 16 hours, and sometimes longer. Increase the temperature to 73-75 F (23-24 C), and the bulk fermentation time is reduced to around 9 hours. Last, very warm temperatures, 78-80 F (25-27 C) generally take only 4 hours to complete fermentation. All in all, your dough is in your hands, and in your climate.
However, if you do not use the refrigerator at all in the entire process, it is easy to rely on visual cues. In this case, simply watch the dough until it doubles in size. A container with straight sides can help with this. Then, you can shape the dough and watch it again until it looks puffy and maybe even doubles in size again.
The goal with fermentation is to push it as long as possible. Bread that tastes gummy or chewy could always ferment longer. A well-fermented dough should taste light, airy, and soft. If you are having trouble achieving this kind of texture before the dough “overproofs” (which is when the bacteria have completely degraded the flour), this is a sign of starter imbalance. This topic is way too complicated, and I will save it for another day.
Shaping
Since we are only making one loaf of bread, it is not necessary to pre-shape the dough. Simply turn it out, and shape it using your preferred method for a boule or batard before adding to your banneton.
It is important to be very gentle with the dough during this step, if you want to keep air bubbles intact, that is. If not, simply pat the dough all over after turning out, which will degass the dough and result in a more closed and even crumb.
Cold Proof
A cold proof is always an option to extend the baking timeline, which creates flexibility. I cold ferment this dough when I make it in the morning and let it bulk ferment all day. I skip the cold ferment when I make the dough at night and let it bulk ferment overnight. You can bake this loaf straight from the fridge, or after a minimum one hour rest on the counter after shaping.
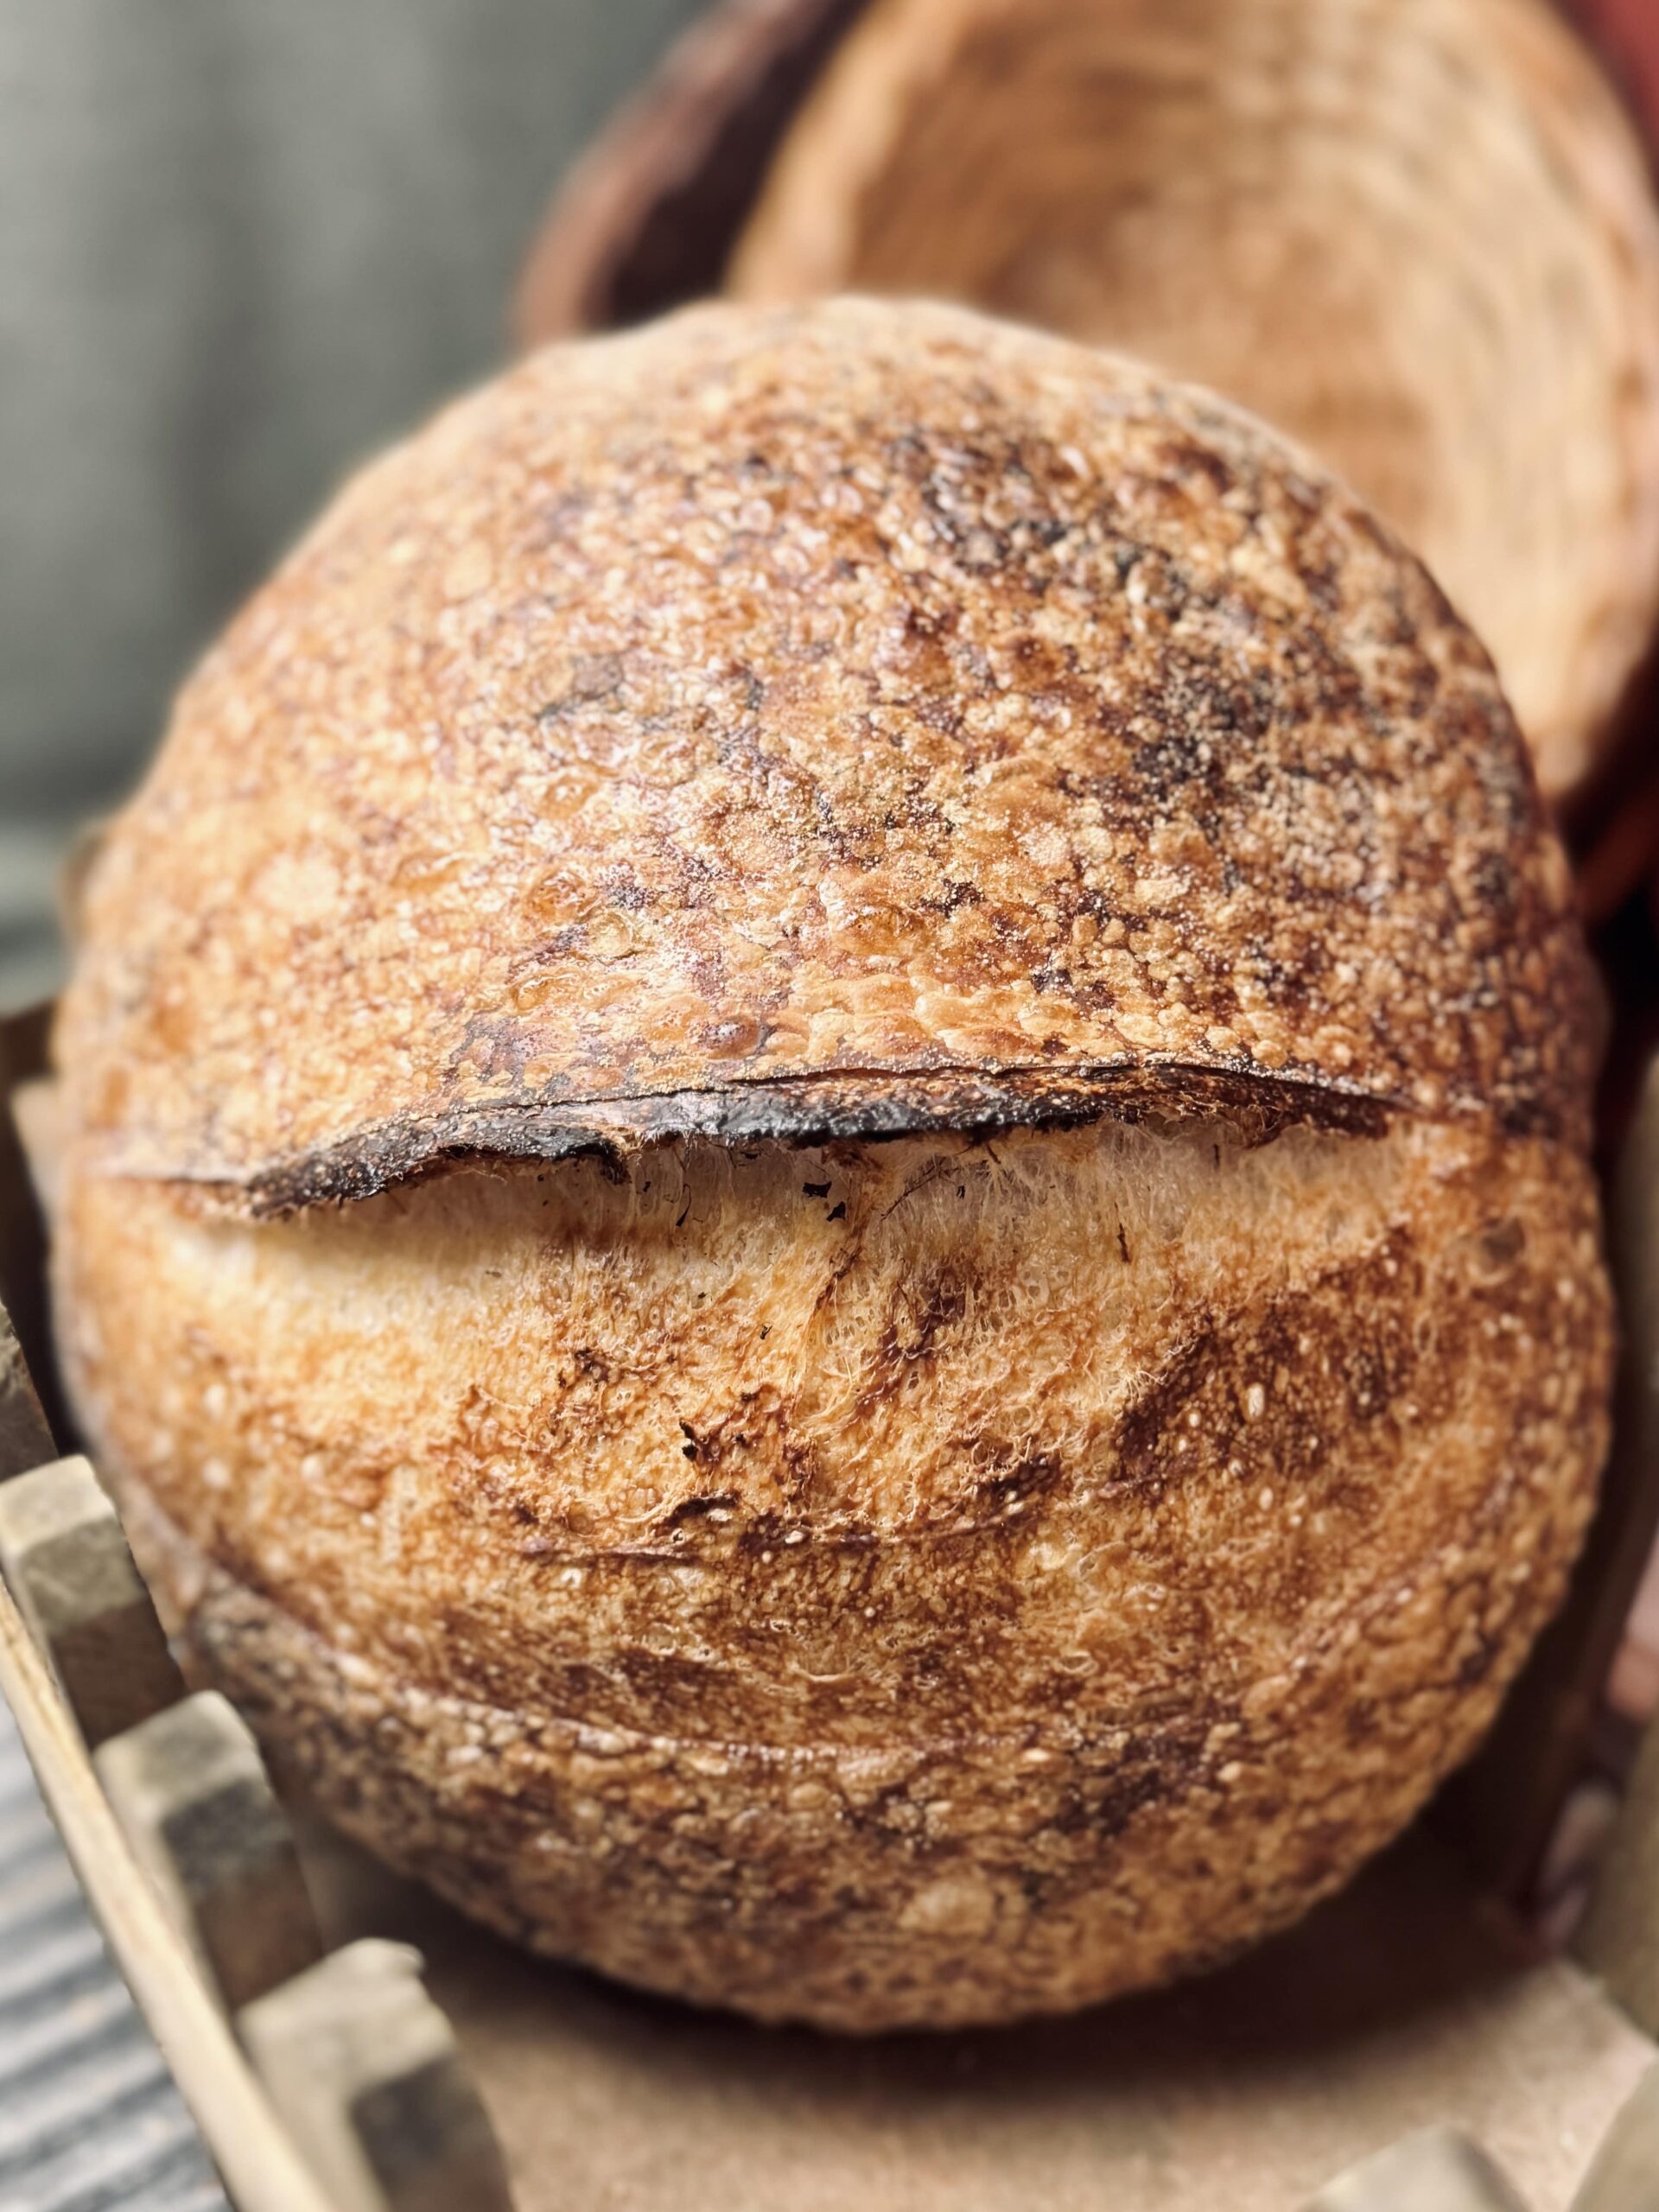
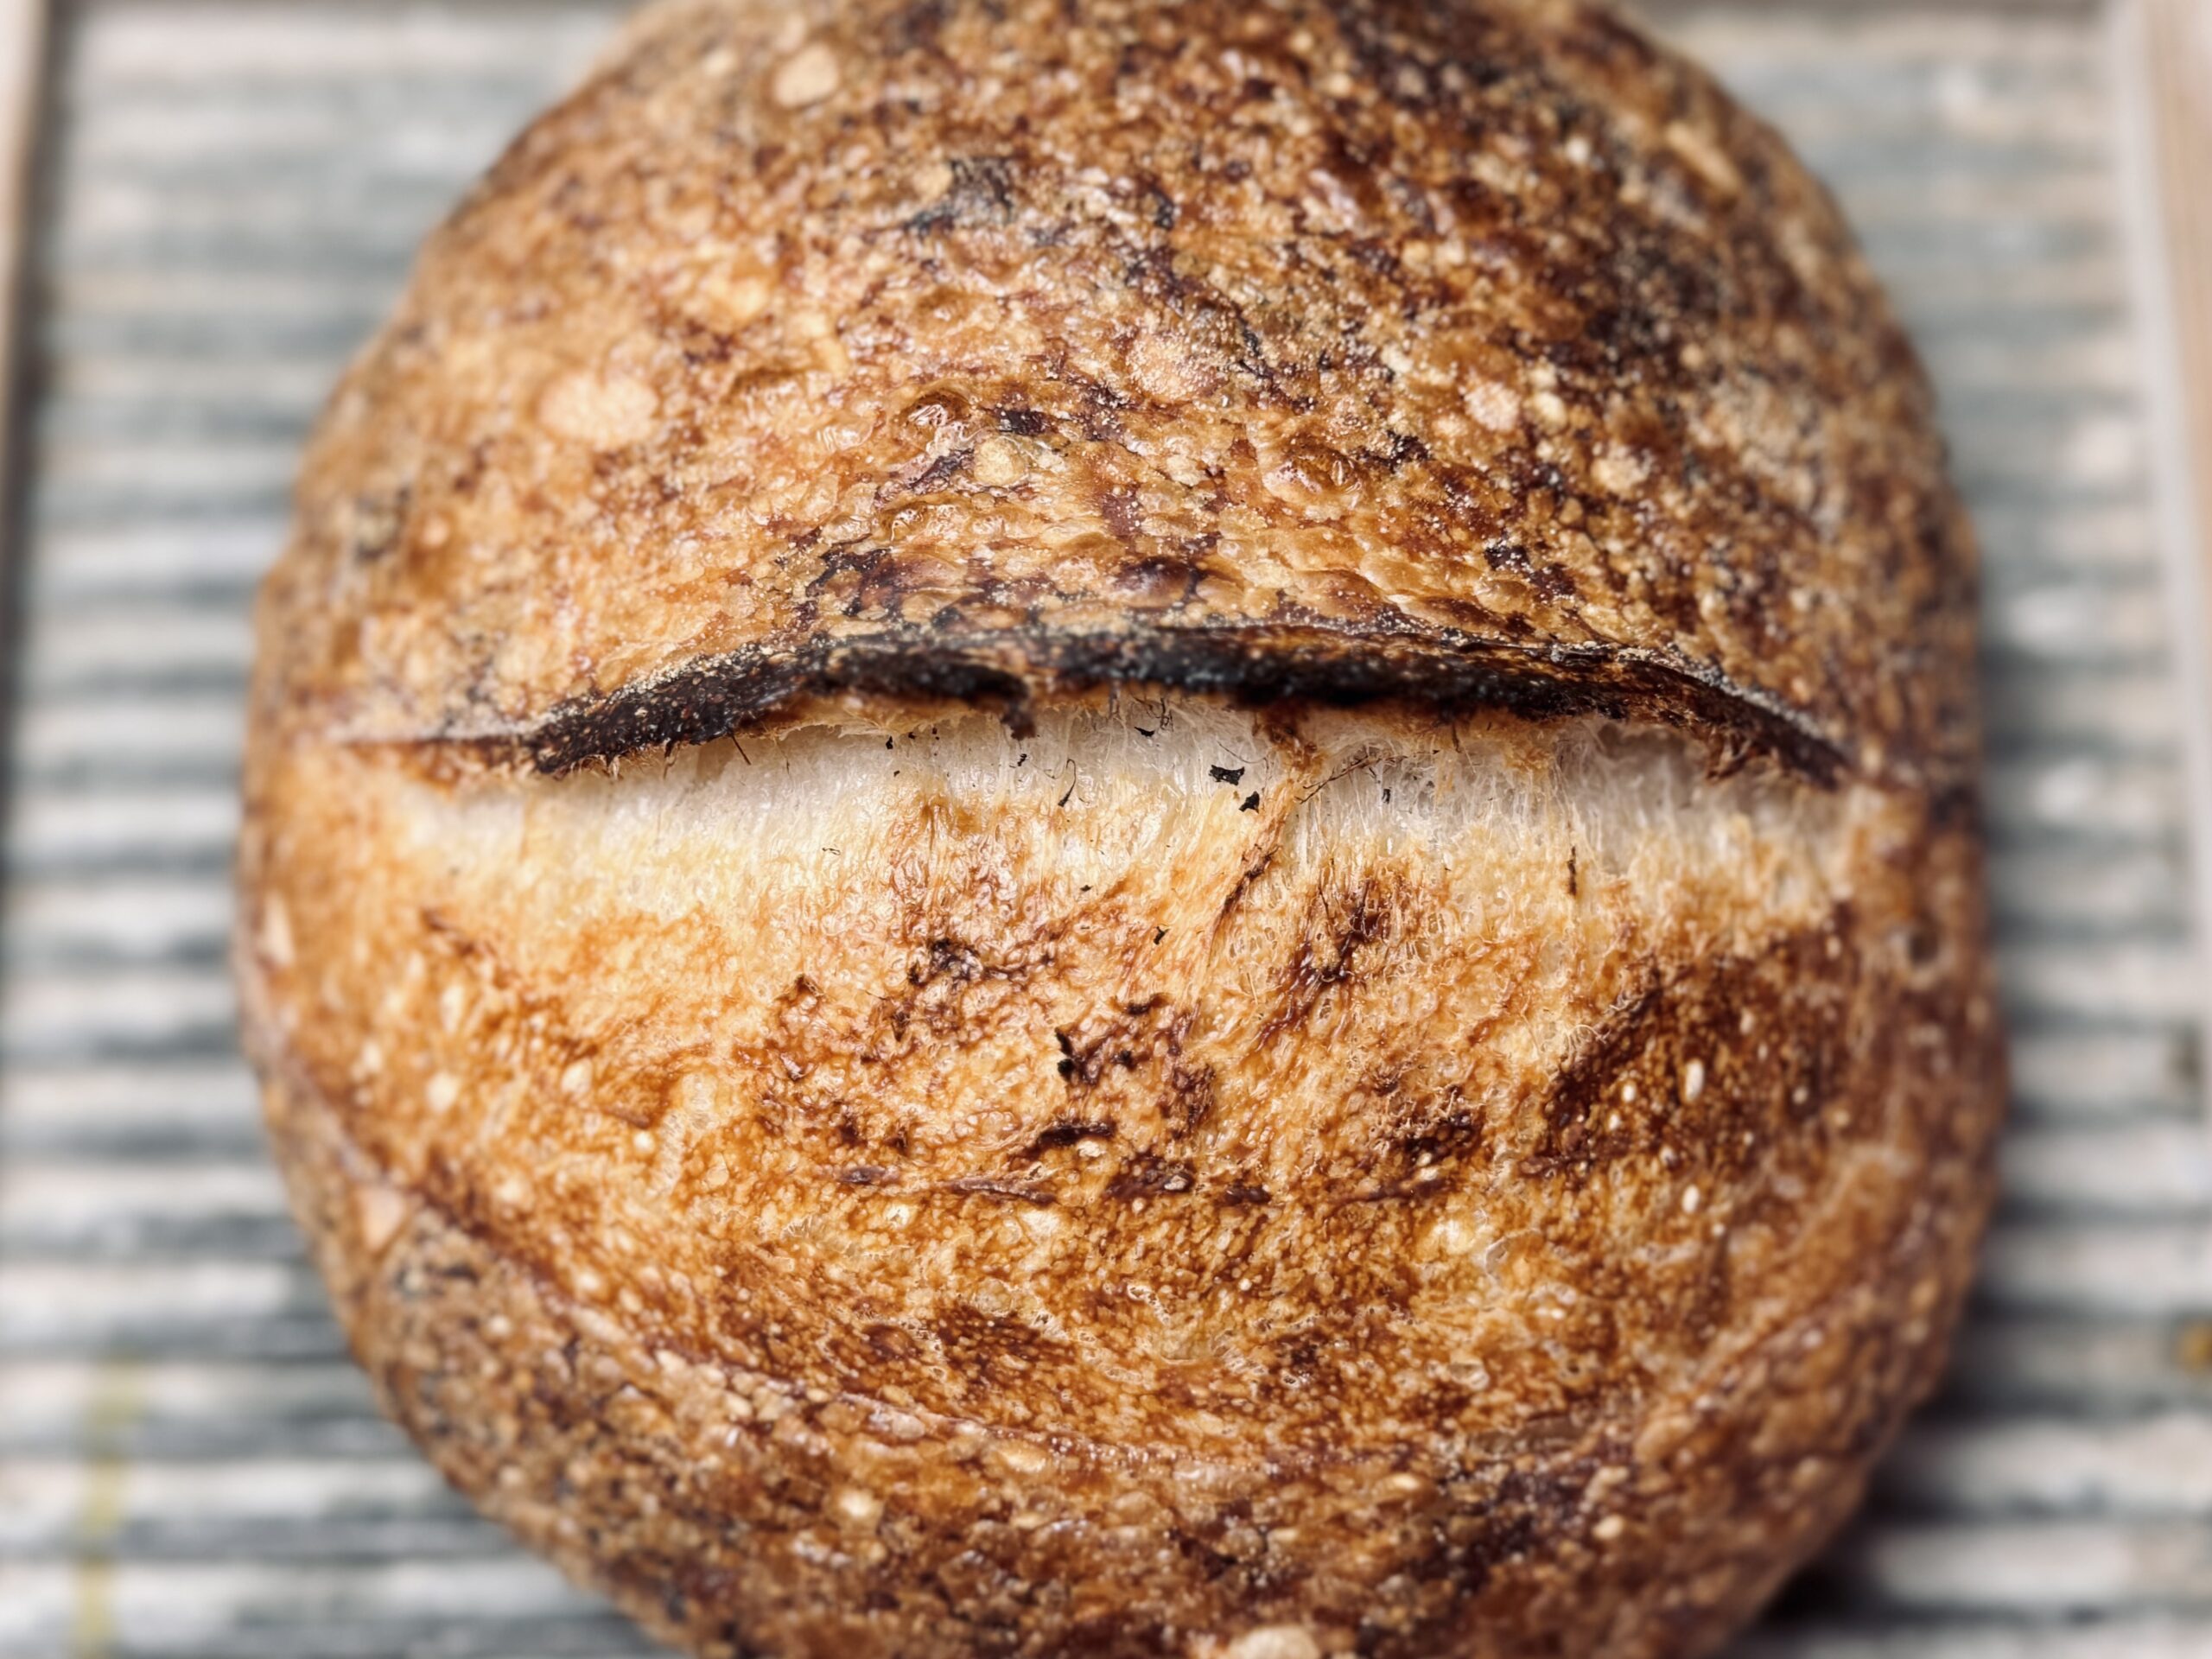
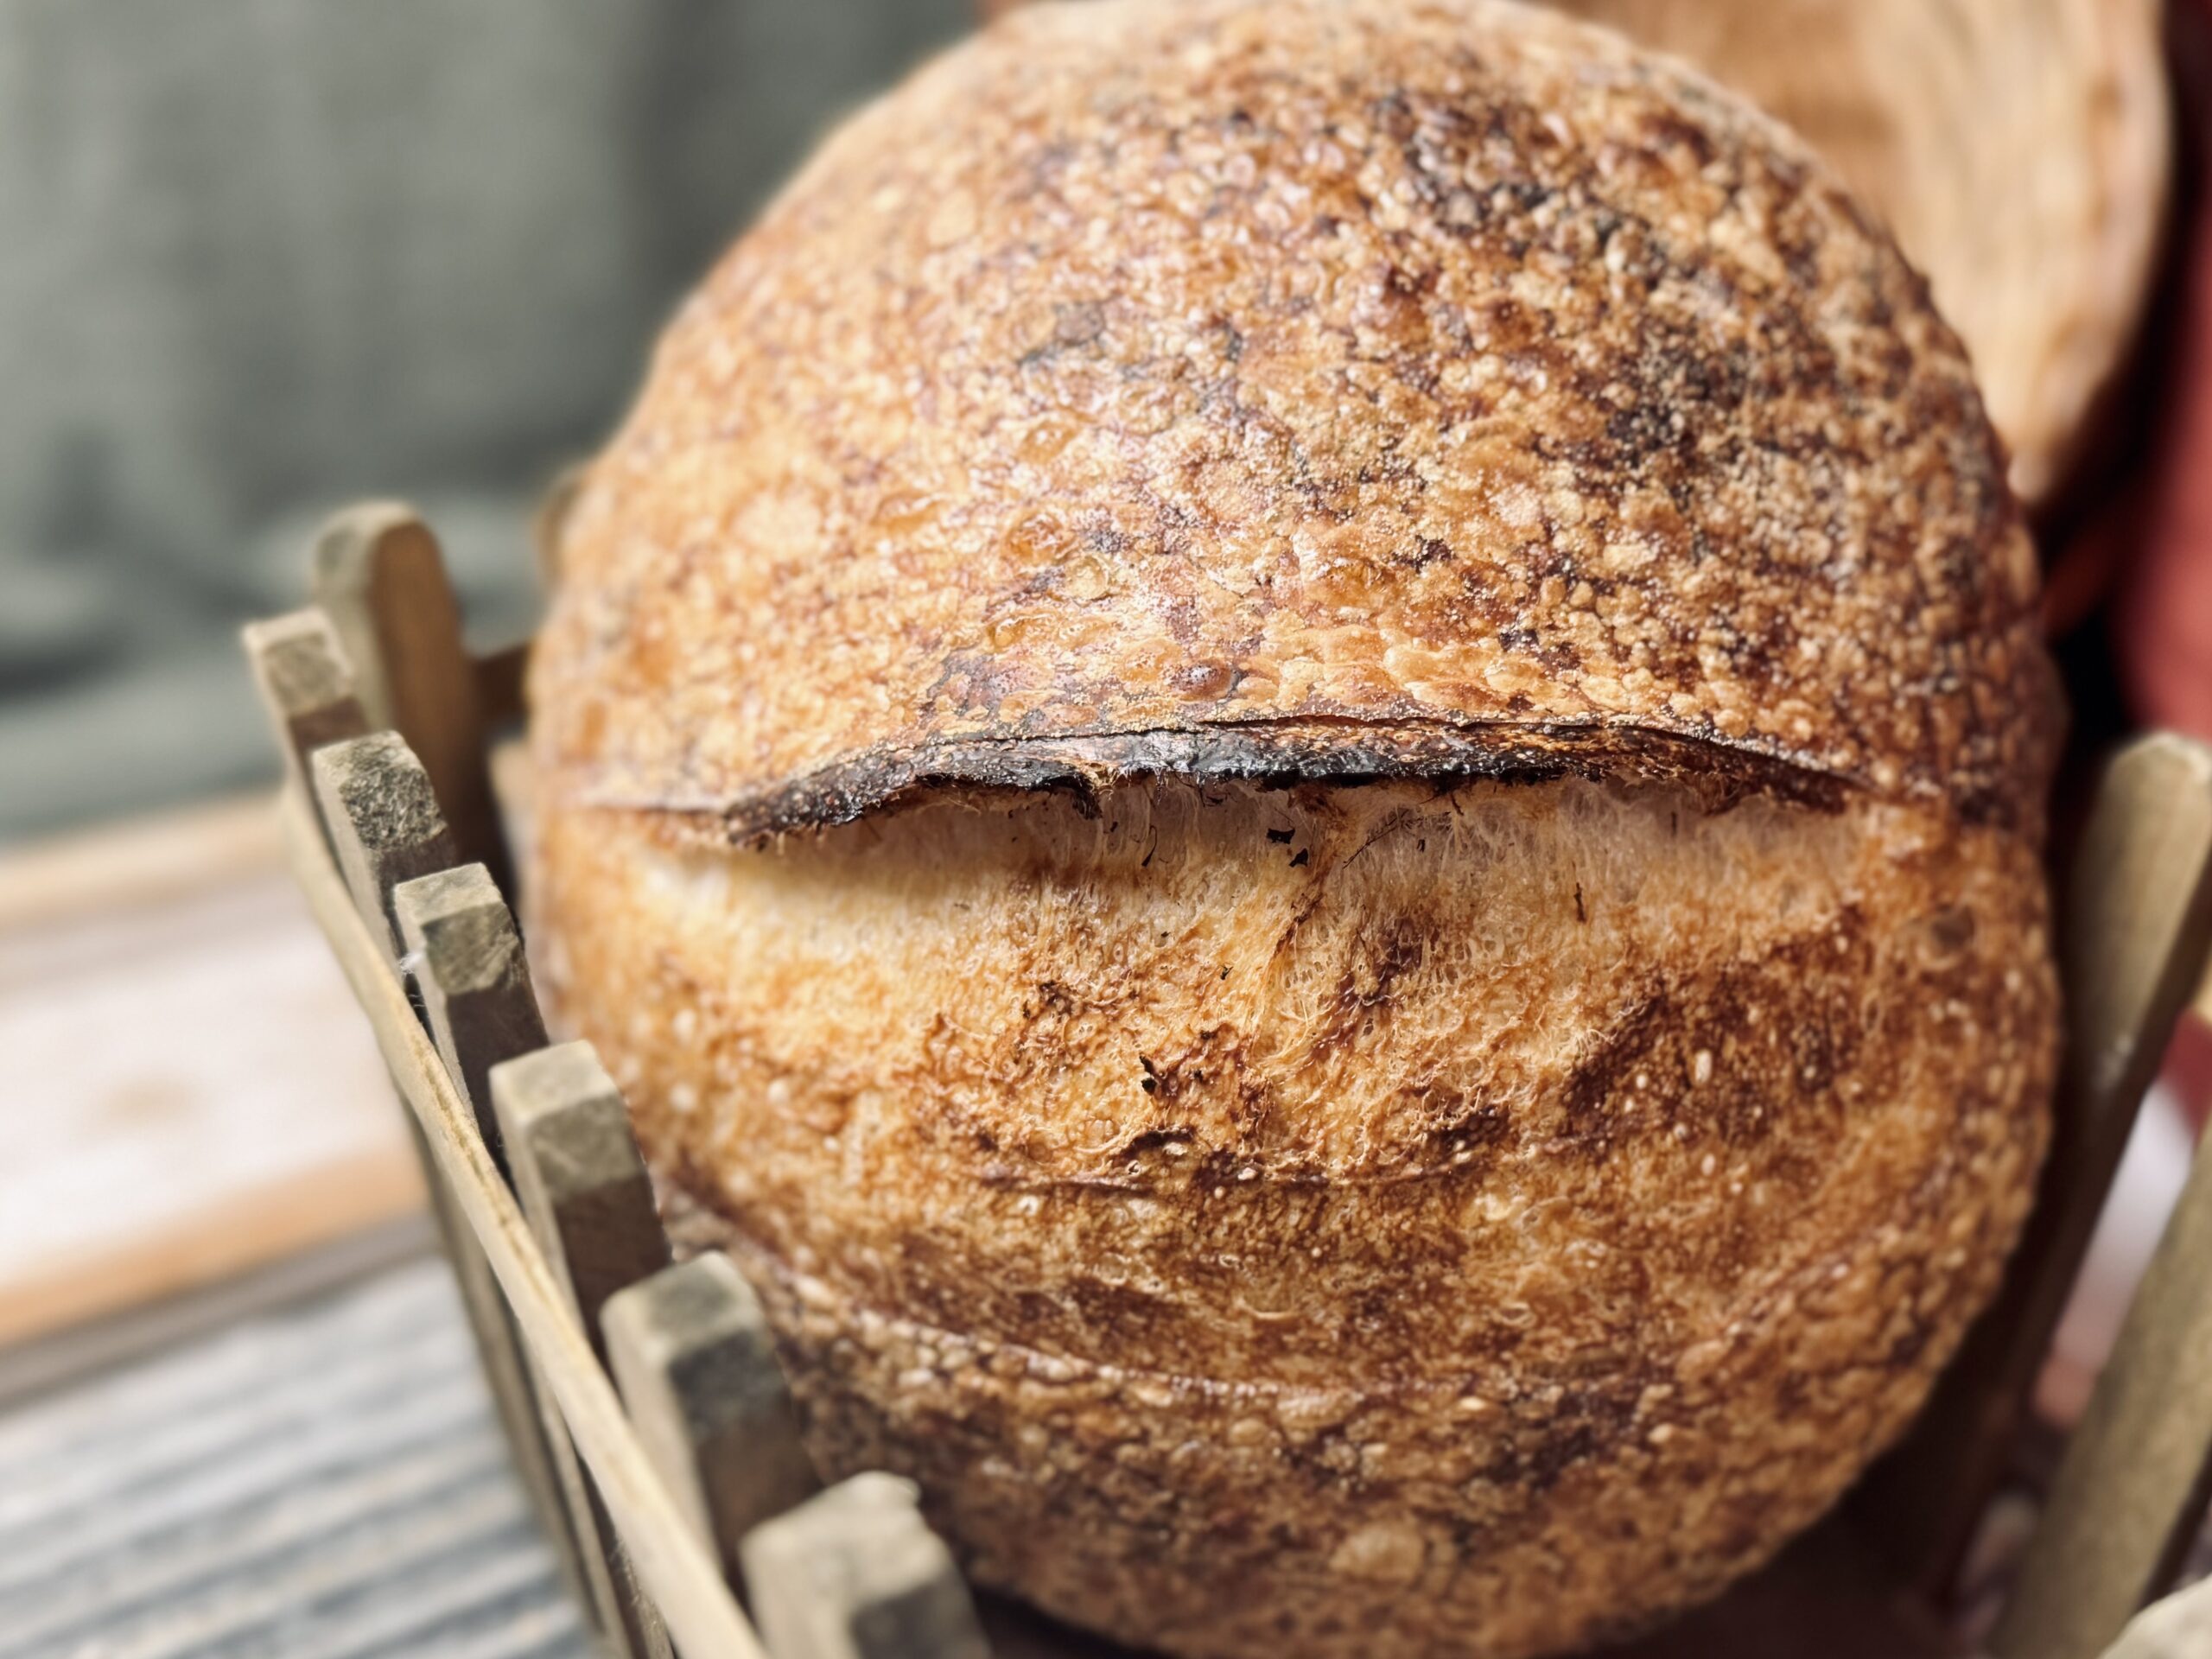
Scoring
I am super simple when it comes to scoring. You only need one score, 1/4 to 1/2 inch deep, to help this loaf expand without cracking all over. I am not about decorative scoring, but if you are, then go for it!
Baking Method: Temperature
The best oven spring and crumb comes from baking the dough hot and fast. I chose a temperature of 500 F to give the dough the best “pop” in the oven.
Baking Method: Steam
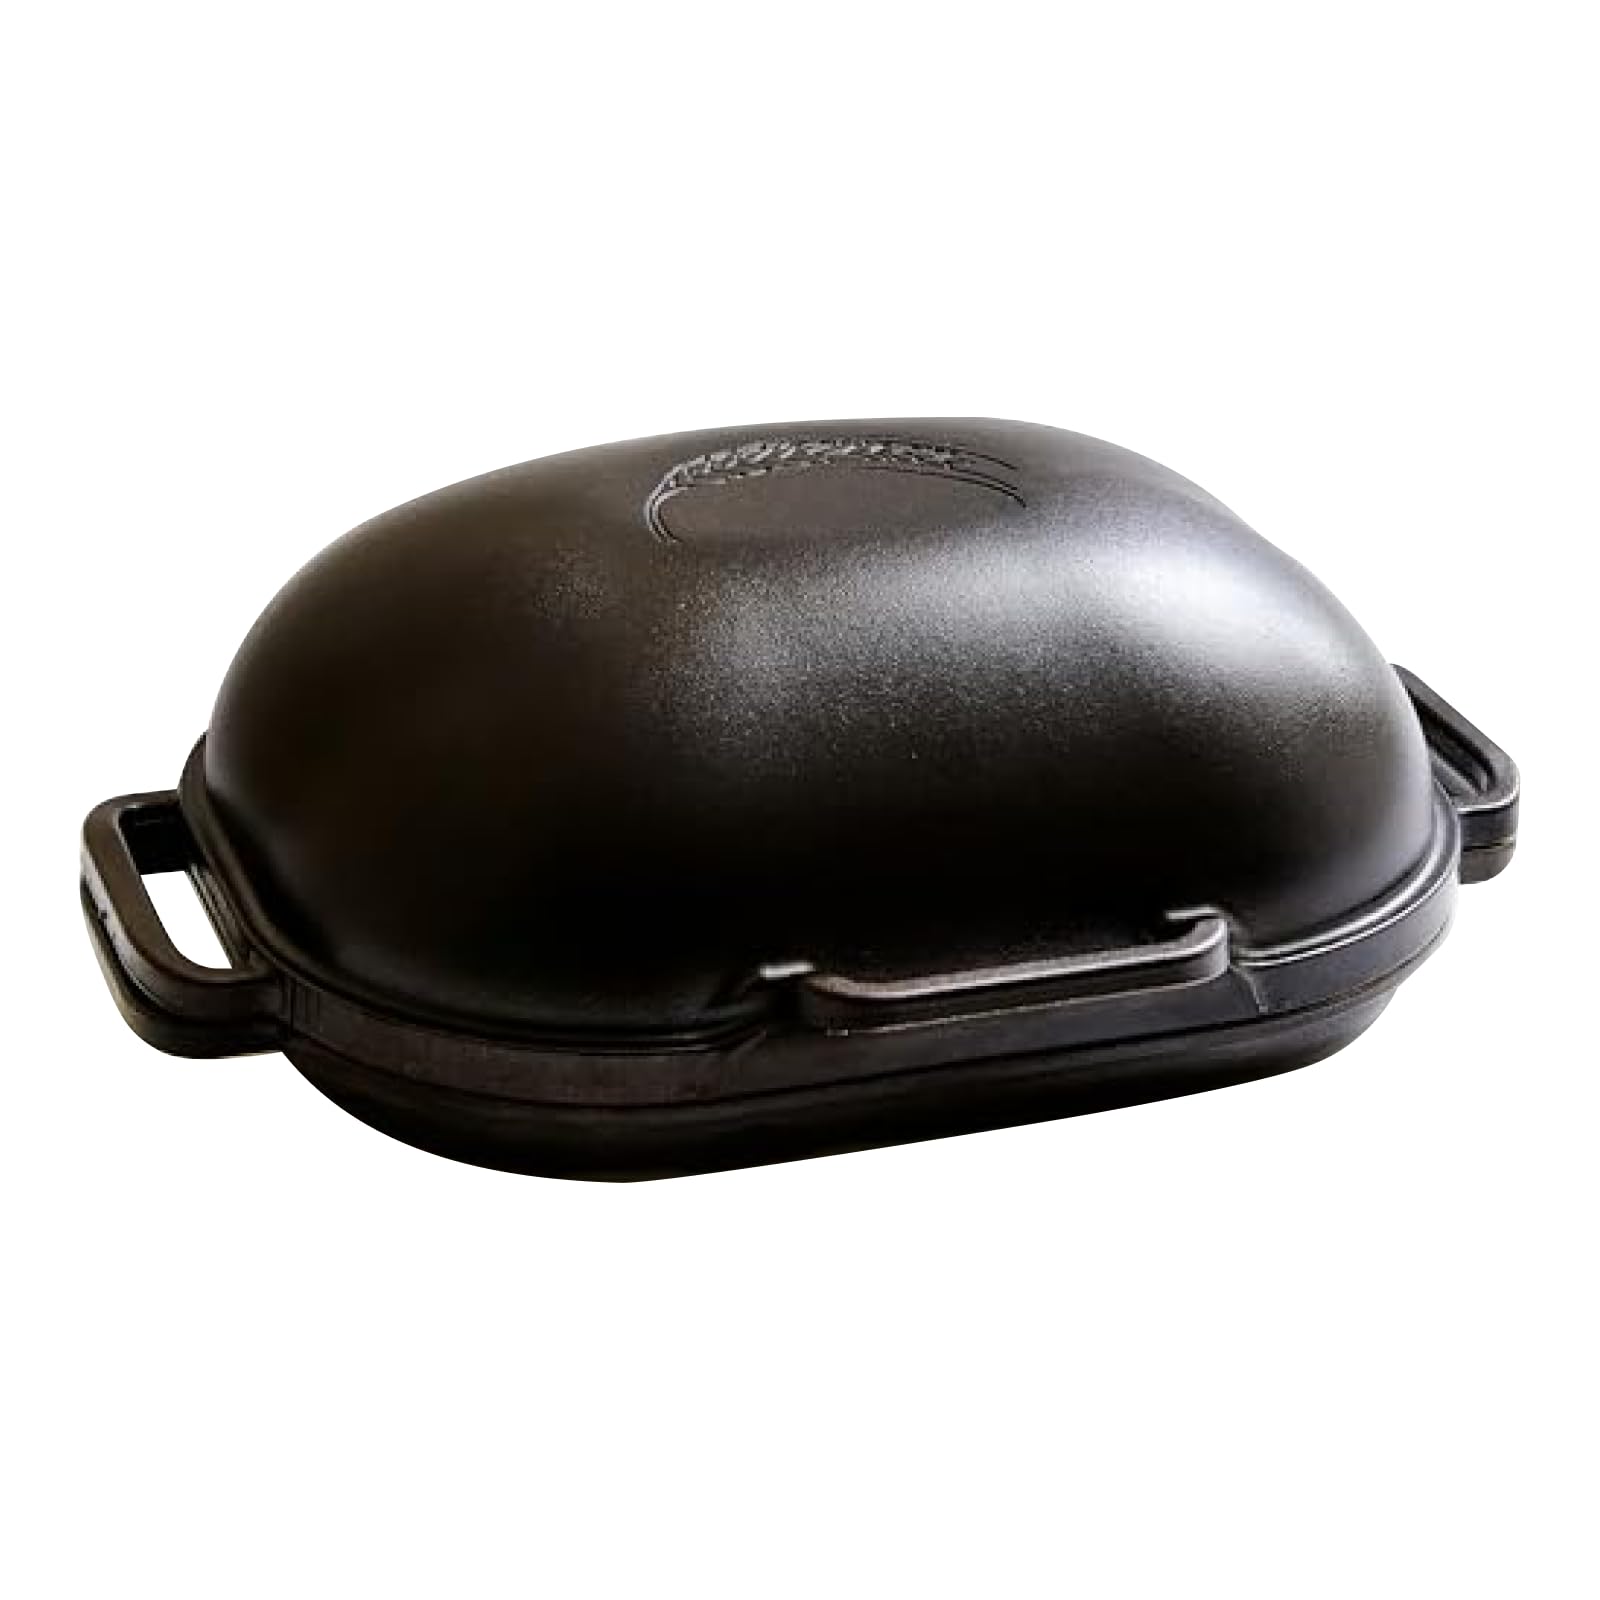
Because I have a gas oven, it is hard to open bake. I open bake breads that are smaller in size, such as bialy or pan de cristal, but whole loaves do not do well. Therefore, I always use a Dutch oven for bakes like this (lid on for the first half of baking [steam], lid off second half [to firm up the crust]). Currently, that is my Challenger Bread Pan (which I absolutely love!).
In reality, you can open bake this bread, just make sure your oven has plenty of steam for the first twenty minutes of baking to help the dough expand properly. Open-baking works best with electric ovens that do not have vents. The main goal: make sure your bread has the ability to expand to its maximum potential before the crust begins to harden.
Suggested Timelines
Suggested Timeline
DAY 1
8:00 a.m.
- Mix the dough.
5:00 – 9:00 p.m.
- Shape and refrigerate the dough.
DAY 2
8:00 a.m.
- Bake and enjoy!
Work Day Timeline
DAY 1
8:00 p.m.
- Mix the dough.
DAY 2
6:00 – 8:00 a.m.
- Shape and refrigerate the dough.
After Work
- Bake and enjoy!

📌 Quick Tip: Read the recipe in its entirety before you start cooking. This will help you understand the ingredients, steps, and timing involved, and allow you to prepare any necessary equipment or ingredients beforehand.
Stand Mixer Sourdough

Ingredients
Instructions
-
Mix about half of the water (just eyeball it) and all of the starter in a stand mixer, using the paddle attachment or by hand, until the starter is dissolved and fully incorporated.
-
Switch to the dough hook. Add all of the flour and all of the salt, then begin mixing on a low to medium-low speed. Drizzle in the remaining water until a cohesive dough is formed. You may or may not use all of the water. The dough should be wet enough to stick to the bottom of the mixer (during the first part of mixing; it may pick itself up once it gains strength), but firm enough that the mixer can knead it efficiently.
-
Increase the mixer to a medium-low to medium speed. Knead the dough until you can pull up on it without it tearing, 10-15 minutes.
Stop the mixer and check the windowpane. You want the be able to see through the dough only slightly. It should still have some dark patches (not see-through) interspersed with clear (see-through) dough. It should still tear when stretched excessively. If you can check both of these boxes, the dough is ready to rest and ferment.
-
Bulk ferment the dough according to the fermenting temperature and whether you want to cold proof the dough after shaping. Use the guidelines in the post above to help you, or use your normal fermenting timeline.
For a dough that never enters the refrigerator, you can use visual cues. Bulk ferment the dough to double in size before shaping.
It may be helpful to check on the dough one or two times during bulk fermentation. If the dough is looking slack or rough (as opposed to smooth) on top, it may not have been kneaded enough. If you notice this, simply give the dough a set of folds to give it some structure. -
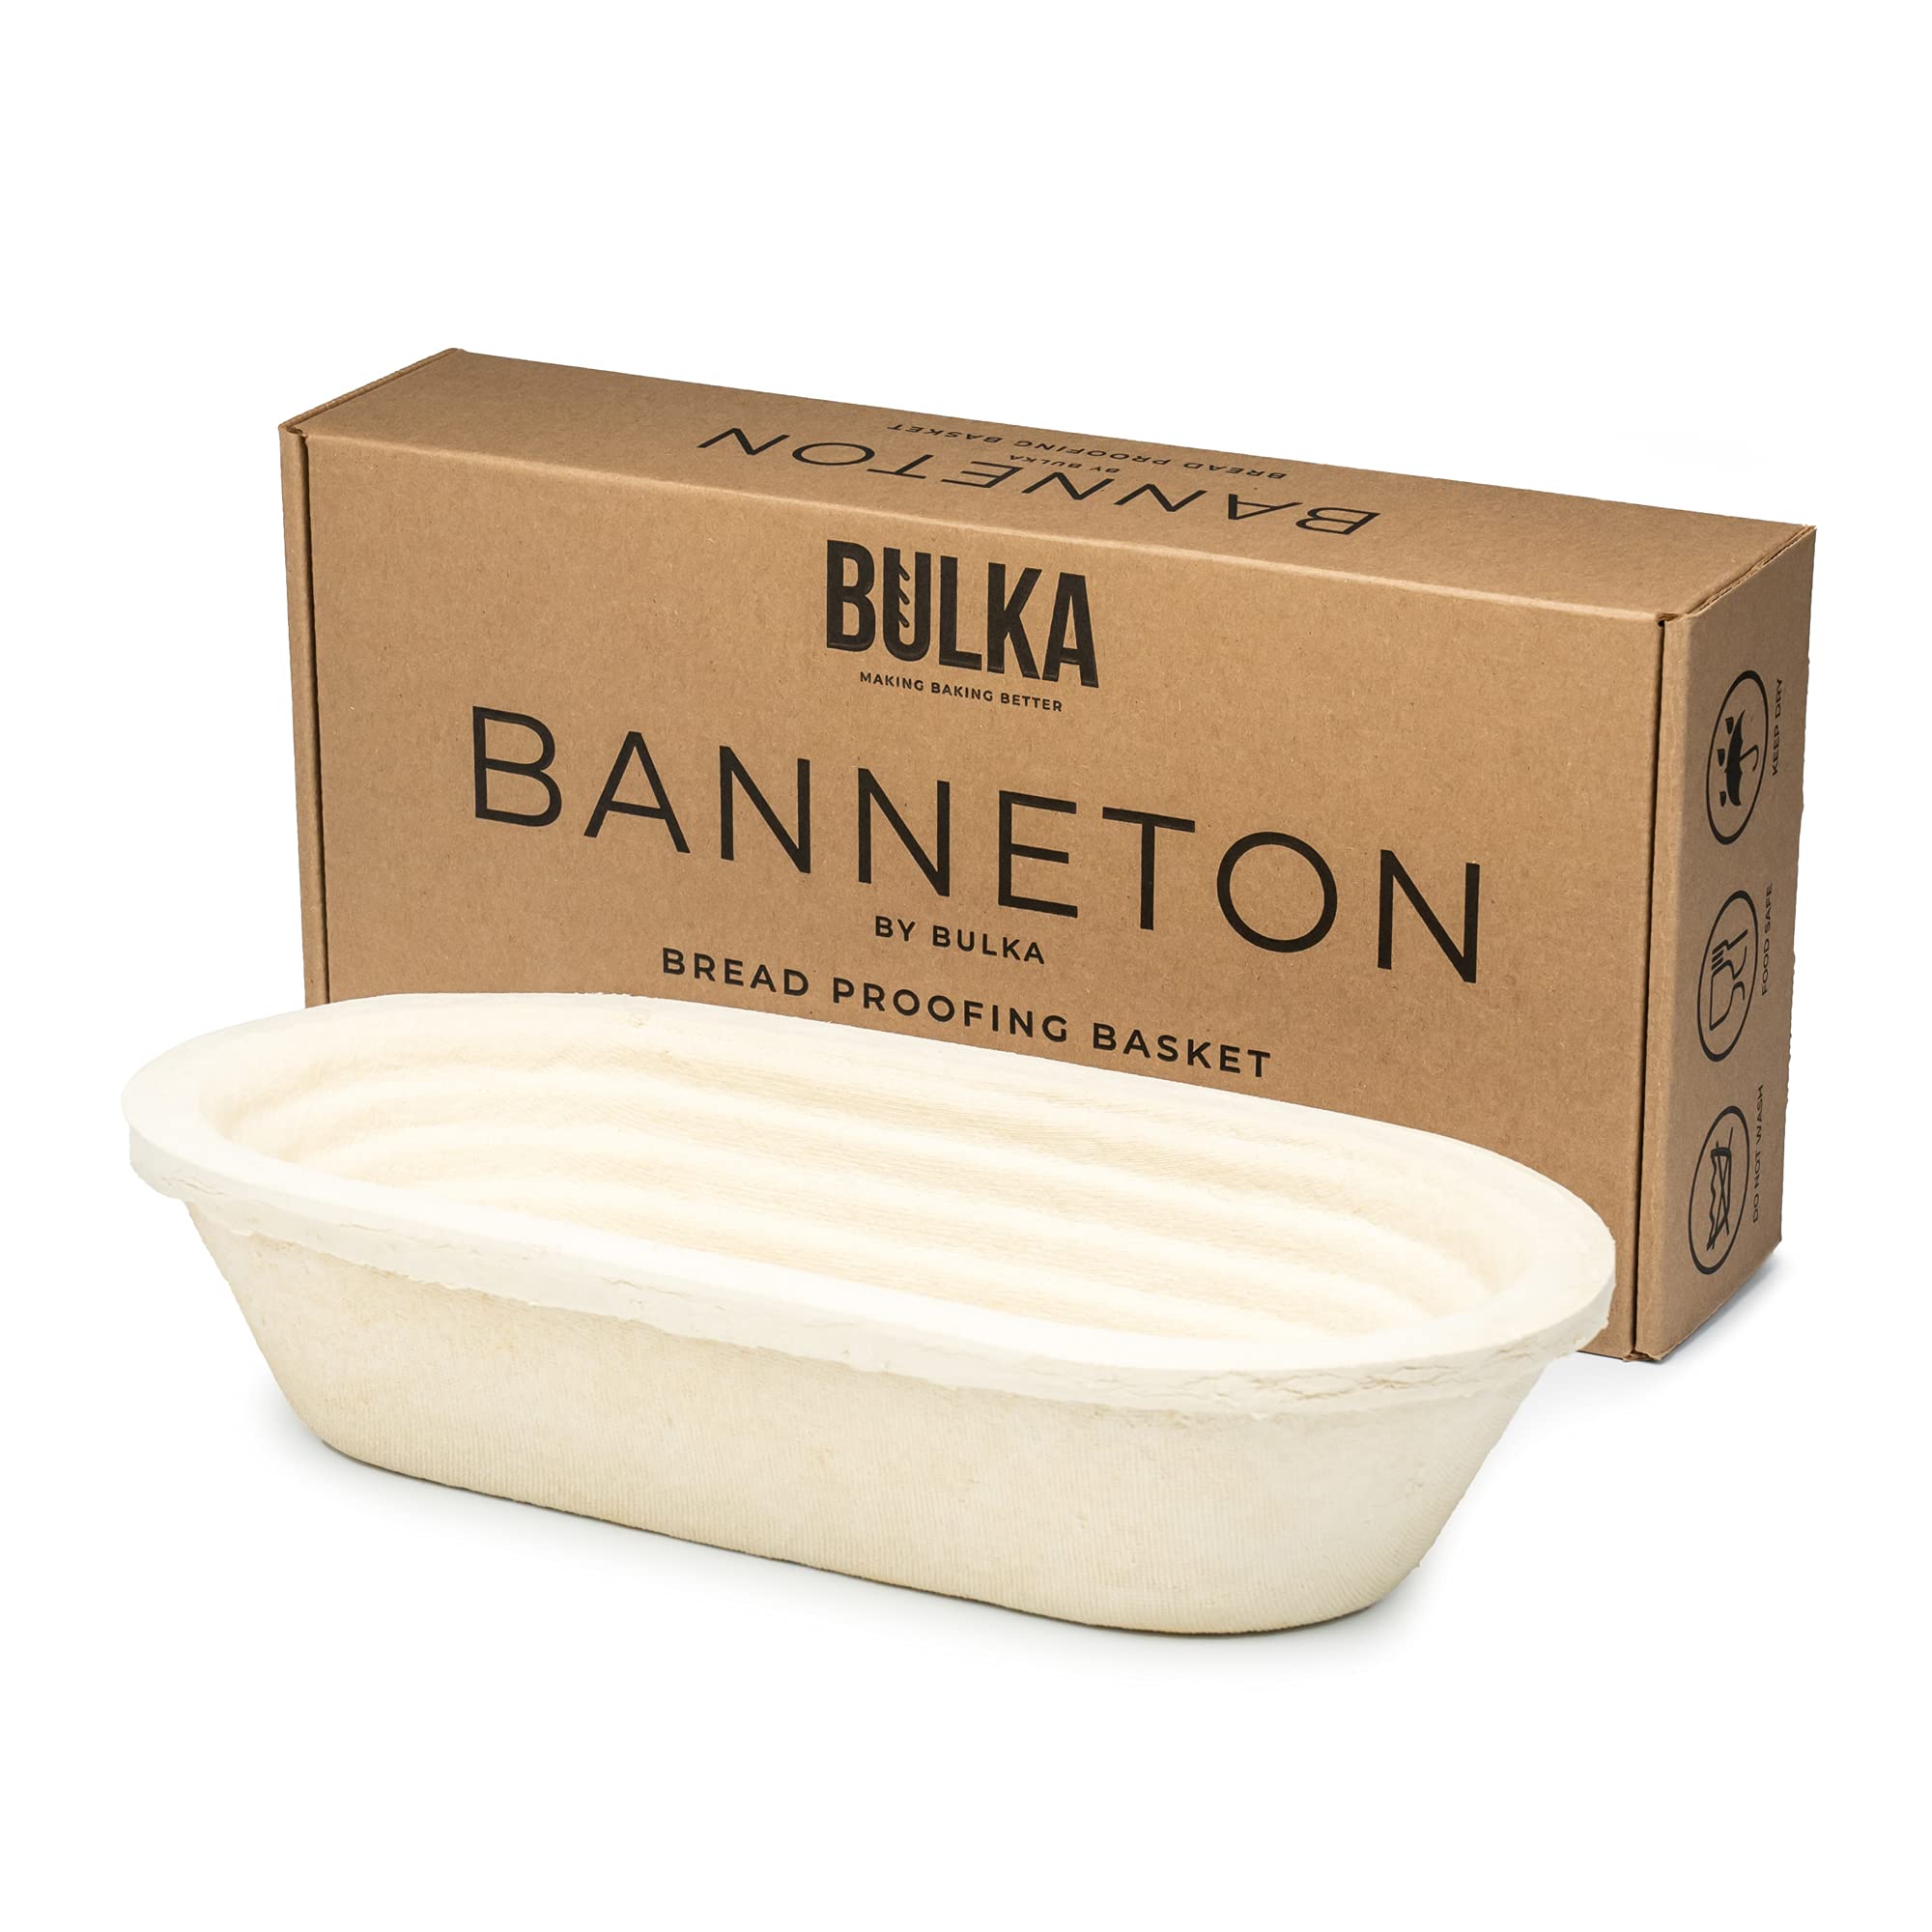
After the dough is finished bulk fermenting, lightly flour a banneton (or a towel/cheesecloth inserted into a 1.5 qt mixing bowl) with rice flour to prevent sticking, or regular flour if you don't have this option (though, some sticking may occur as the flour is absorbed into the dough during the resting period).
-
Turn the dough out onto a lightly floured or watered counter. Shape the dough into a boule (round) or batard (oval):
Boule: Fold the left and right sides of the dough into the center. Fold the top down to the center, then fold the bottom all the way over, so that the top is smooth and the seams are now on the bottom. Use your hands or bench scraper to push and tuck the top of the dough underneath to form a smooth round.
Batard: Fold the left and right sides of the dough into the center. Starting from the top, roll the dough downward to form a log.
-
Use a bench scraper to scoop the dough up and gently place it seam side up into your banneton. Pinch the seams closed.
-
Let the dough rest again in the banneton until it is noticeably puffy, one to three more hours. Or, let it rest in the refrigerator overnight.
-
When your dough is nearing the end of the final proof, preheat your oven to 500 F with a Dutch oven inside. I also like to place a baking stone on the rack underneath the Dutch oven, which helps redirect heat and prevent the bottom of my loaf from burning. Preheat for one hour before baking.
-
Turn your dough out onto a silicone baking mat or a piece of parchment paper.
-
Using a razor blade or bread lame, make one score 1/4 to 1/2 inch deep.
-
Place your scored loaf into the preheated Dutch oven and replace the lid.
-
Bake for 20 minutes with the lid on.
Optionally, five minutes in, score the loaf a second time along the seam where it is expanding. Make sure to keep your razor parallel with the counter. The only purpose of this is to increase expansion and assure a prominent ear on your loaf.
-
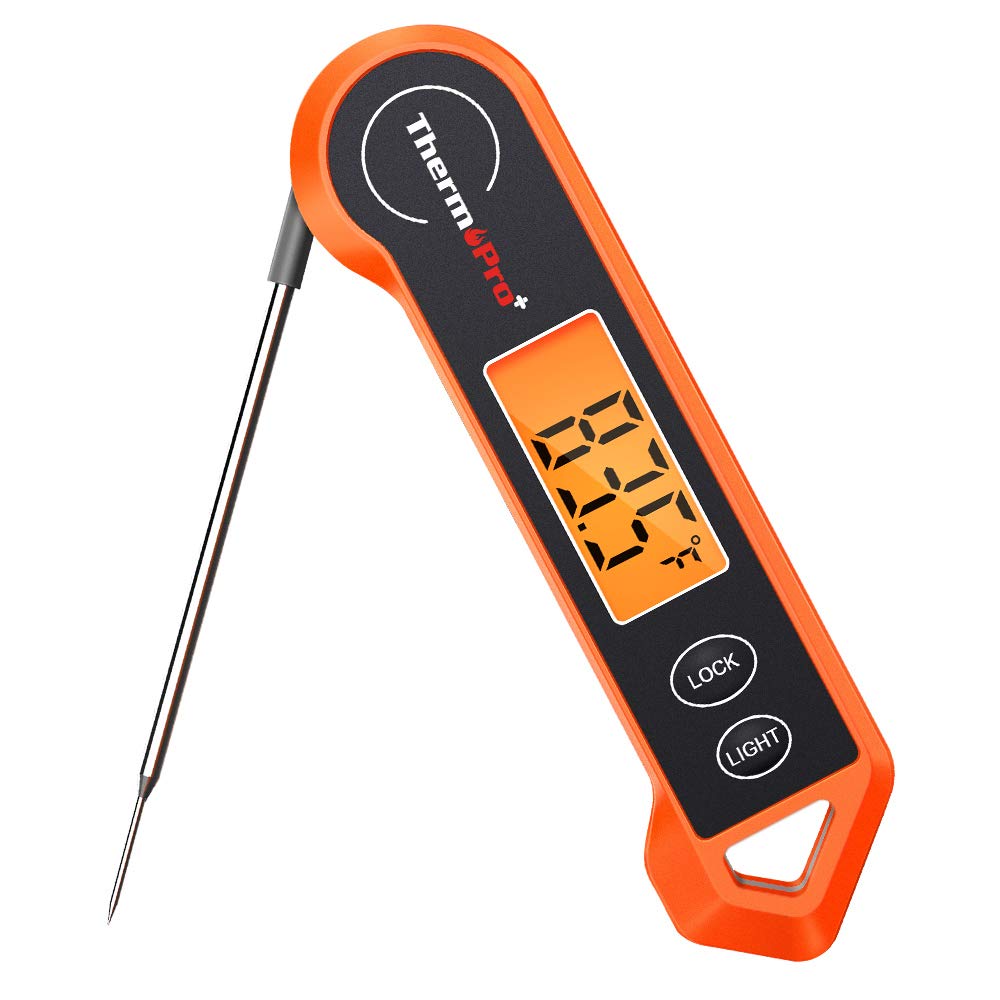
After 20 minutes, remove the lid of the Dutch oven, reduce the oven temperature to 450 F (230 C) and bake 15-20 minutes more, until the loaf is dark and the internal temperature registers 200 F (93 C).
-
Allow the bread to cool for at least 30 minutes (one to two hours is better) before slicing (otherwise the loaf will be slightly gummy).
You might need...


Affiliate Disclosure: This post contains Amazon affiliate links. This means when you buy a product using one of my links, I may receive a small commission at no cost to you. Thank you, in advance, for supporting my work.
Nutrition Facts
Servings 12
- Amount Per Serving
- Calories 173.08kcal
- % Daily Value *
- Total Fat 0.89g2%
- Saturated Fat 0.14g1%
- Sodium 184.1mg8%
- Potassium 51.44mg2%
- Total Carbohydrate 34.53g12%
- Dietary Fiber 1.18g5%
- Sugars 0.51g
- Protein 5.9g12%
- Calcium 11.53 mg
- Iron 2.16 mg
- Vitamin E 0.18 IU
- Vitamin K 0.18 mcg
- Thiamin 0.39 mg
- Riboflavin 0.24 mg
- Niacin 3.54 mg
- Vitamin B6 0.02 mg
- Folate 18.41 mcg
- Phosphorus 49.16 mg
- Magnesium 13.37 mg
- Zinc 0.44 mg
* Nutrition values are auto-calculated and should be used as an approximation only.
Notes
- Storage: Store in a Ziploc or bread bag on the counter for three to five days, or slice and store in the freezer. Toast to warm.


User Reviews
This recipe nailed it! Best loaf I have ever made to date and I have made plenty. Some good, some duds but this recipe is the Boss considering how easy it was.
I’ve been making sourdough bread successfully for 7 years but have never tried the stand mixer method. I’ve made high hydration doughs with success but this one was so wet that I couldn’t shape it very well. In all fairness to you I just dumped all of the ingredients together since I was weighing them out in my stand mixer bowl rather than individually weighing them out like you do. So this is probably why it didn’t turn out for me. They didn’t rise like I had hoped. The dough itself had risen fine but after the shape and cold proof nothing happened. When I took them out of the banneton they flattened out…no biggy, that happens with high hydration dough sometimes but they typically rise quite well in the oven. So the only thing I can make of this is that I added all of the water as I do with all of my other recipes but it was just too much. In the mixer it just would not come together and I had to scrape it out of the bowl. Even after it had risen it poured out of the bowl like thick pancake batter.
I just made this recipe yesterday and baked it today and it came out great. This was my first time making sourdough bread and I am more than happy how it came out. Mine was not like pancake batter at all and looked pretty much like it did in the video. I think maybe one of your measurements was off.