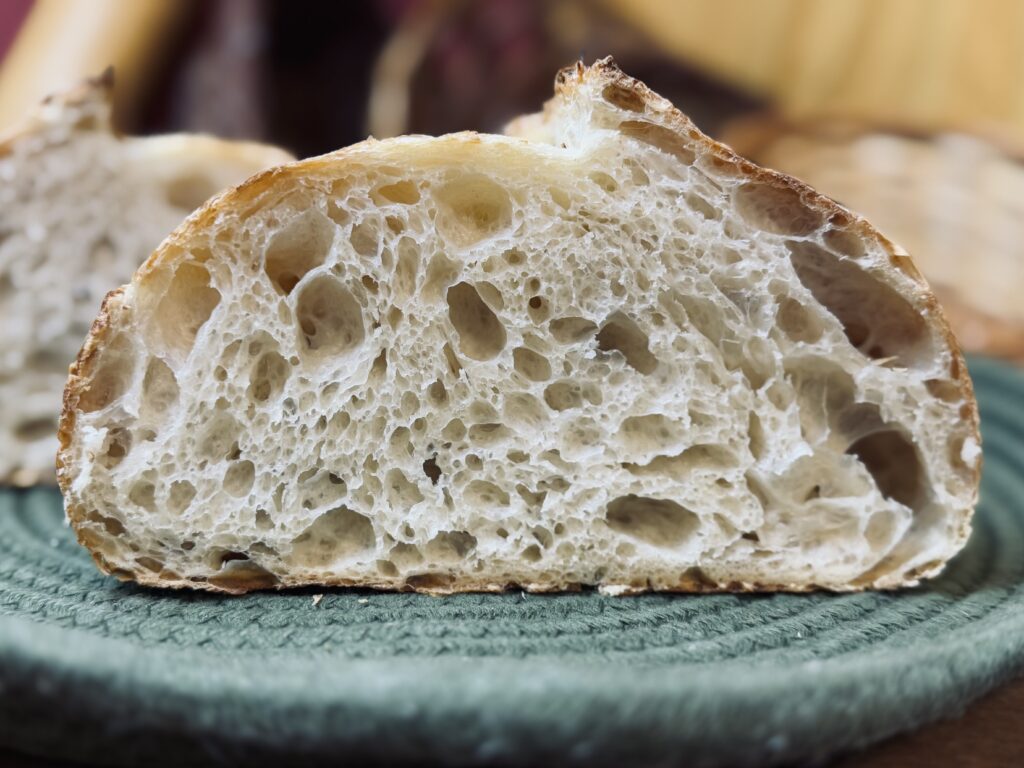
I used to think that maintaining a sourdough starter was easy and versatile. In truth, it can be if you want it to be. However, the level of care you give your starter directly correlates to the quality of bread that comes out of your oven. If you are seeking light, airy, cloud-like bread (like me) then you need a quality fermentation. The catch is: a quality fermentation cannot happen without a quality starter.
Microorganisms Matter
The whole reason we have a sourdough starter in the first place is for those little tiny microorganisms that live inside the flour and water. They are our natural leaven, the things that make our bread rise. I like to call them the “good guys” because they do good things for our food and our bodies. Not only do they raise our bread, but they also break it down, making it more digestible, which can be so important for sensitive eaters.
To really understand the depth of fermentation and why our starter’s care routine matters, we must understand the microorganisms that help raise our dough. When we understand them and learn to treat them right, we can give our bread the quality fermentation it deserves.
Now, there is no way to get this just right. There are hundreds of species of bacteria and fungi that come from the flour, water, air, and even the hands of the baker. Every sourdough starter contains different varieties and balances of species, which come from the surroundings, ingredients, and care routine. However, we can learn enough about them to know the signs of health and appropriate balance in our starter.
Yeast
Yeast are the primary raisers of our bread. People have gone so far as to commercialize them, selling active dry and instant yeast products in stores across the globe. However, with sourdough, we raise them ourselves, with just flour and water. We can control the strength of our yeast by the way that we treat our starter.
Yeast feed on sugars that are broken down by enzymes in the flour. As they feed, they release carbon dioxide (CO2), which is responsible for “blowing up” our bread dough. However, their reproduction and fabrication of CO2 is encouraged by the presence of oxygen. When oxygen is limited, yeast reproduction slows and they produce more alcohol than carbon dioxide.
Yeast reproduction is also affected by acidity. Too much acidity, and yeasts slow.
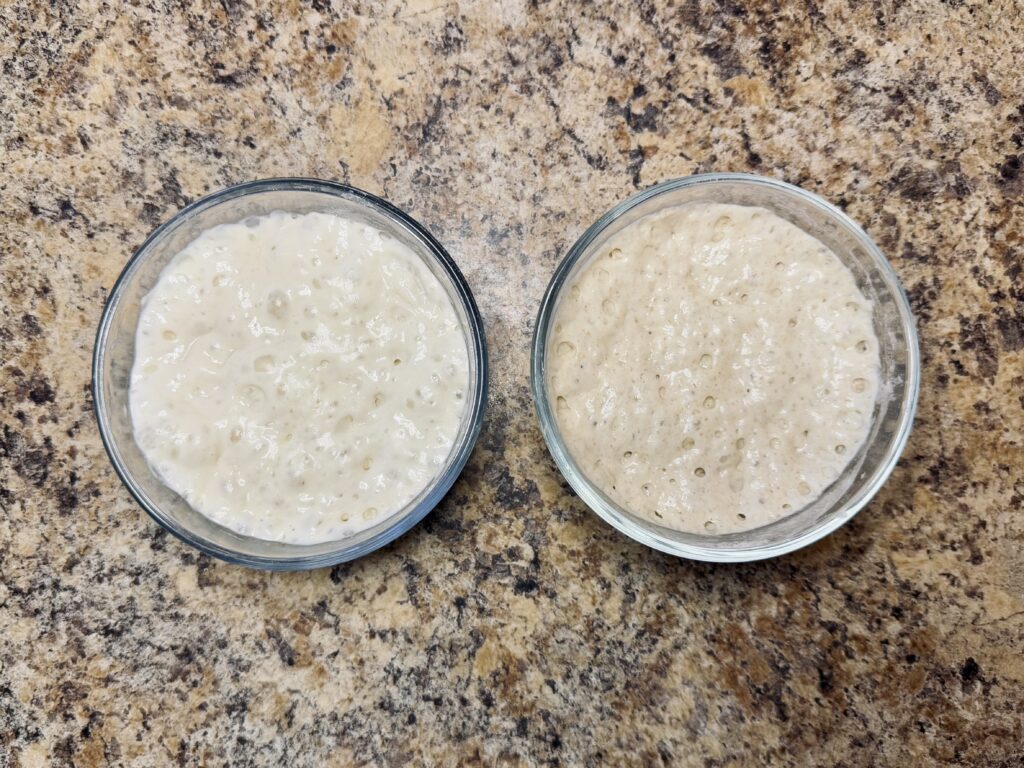
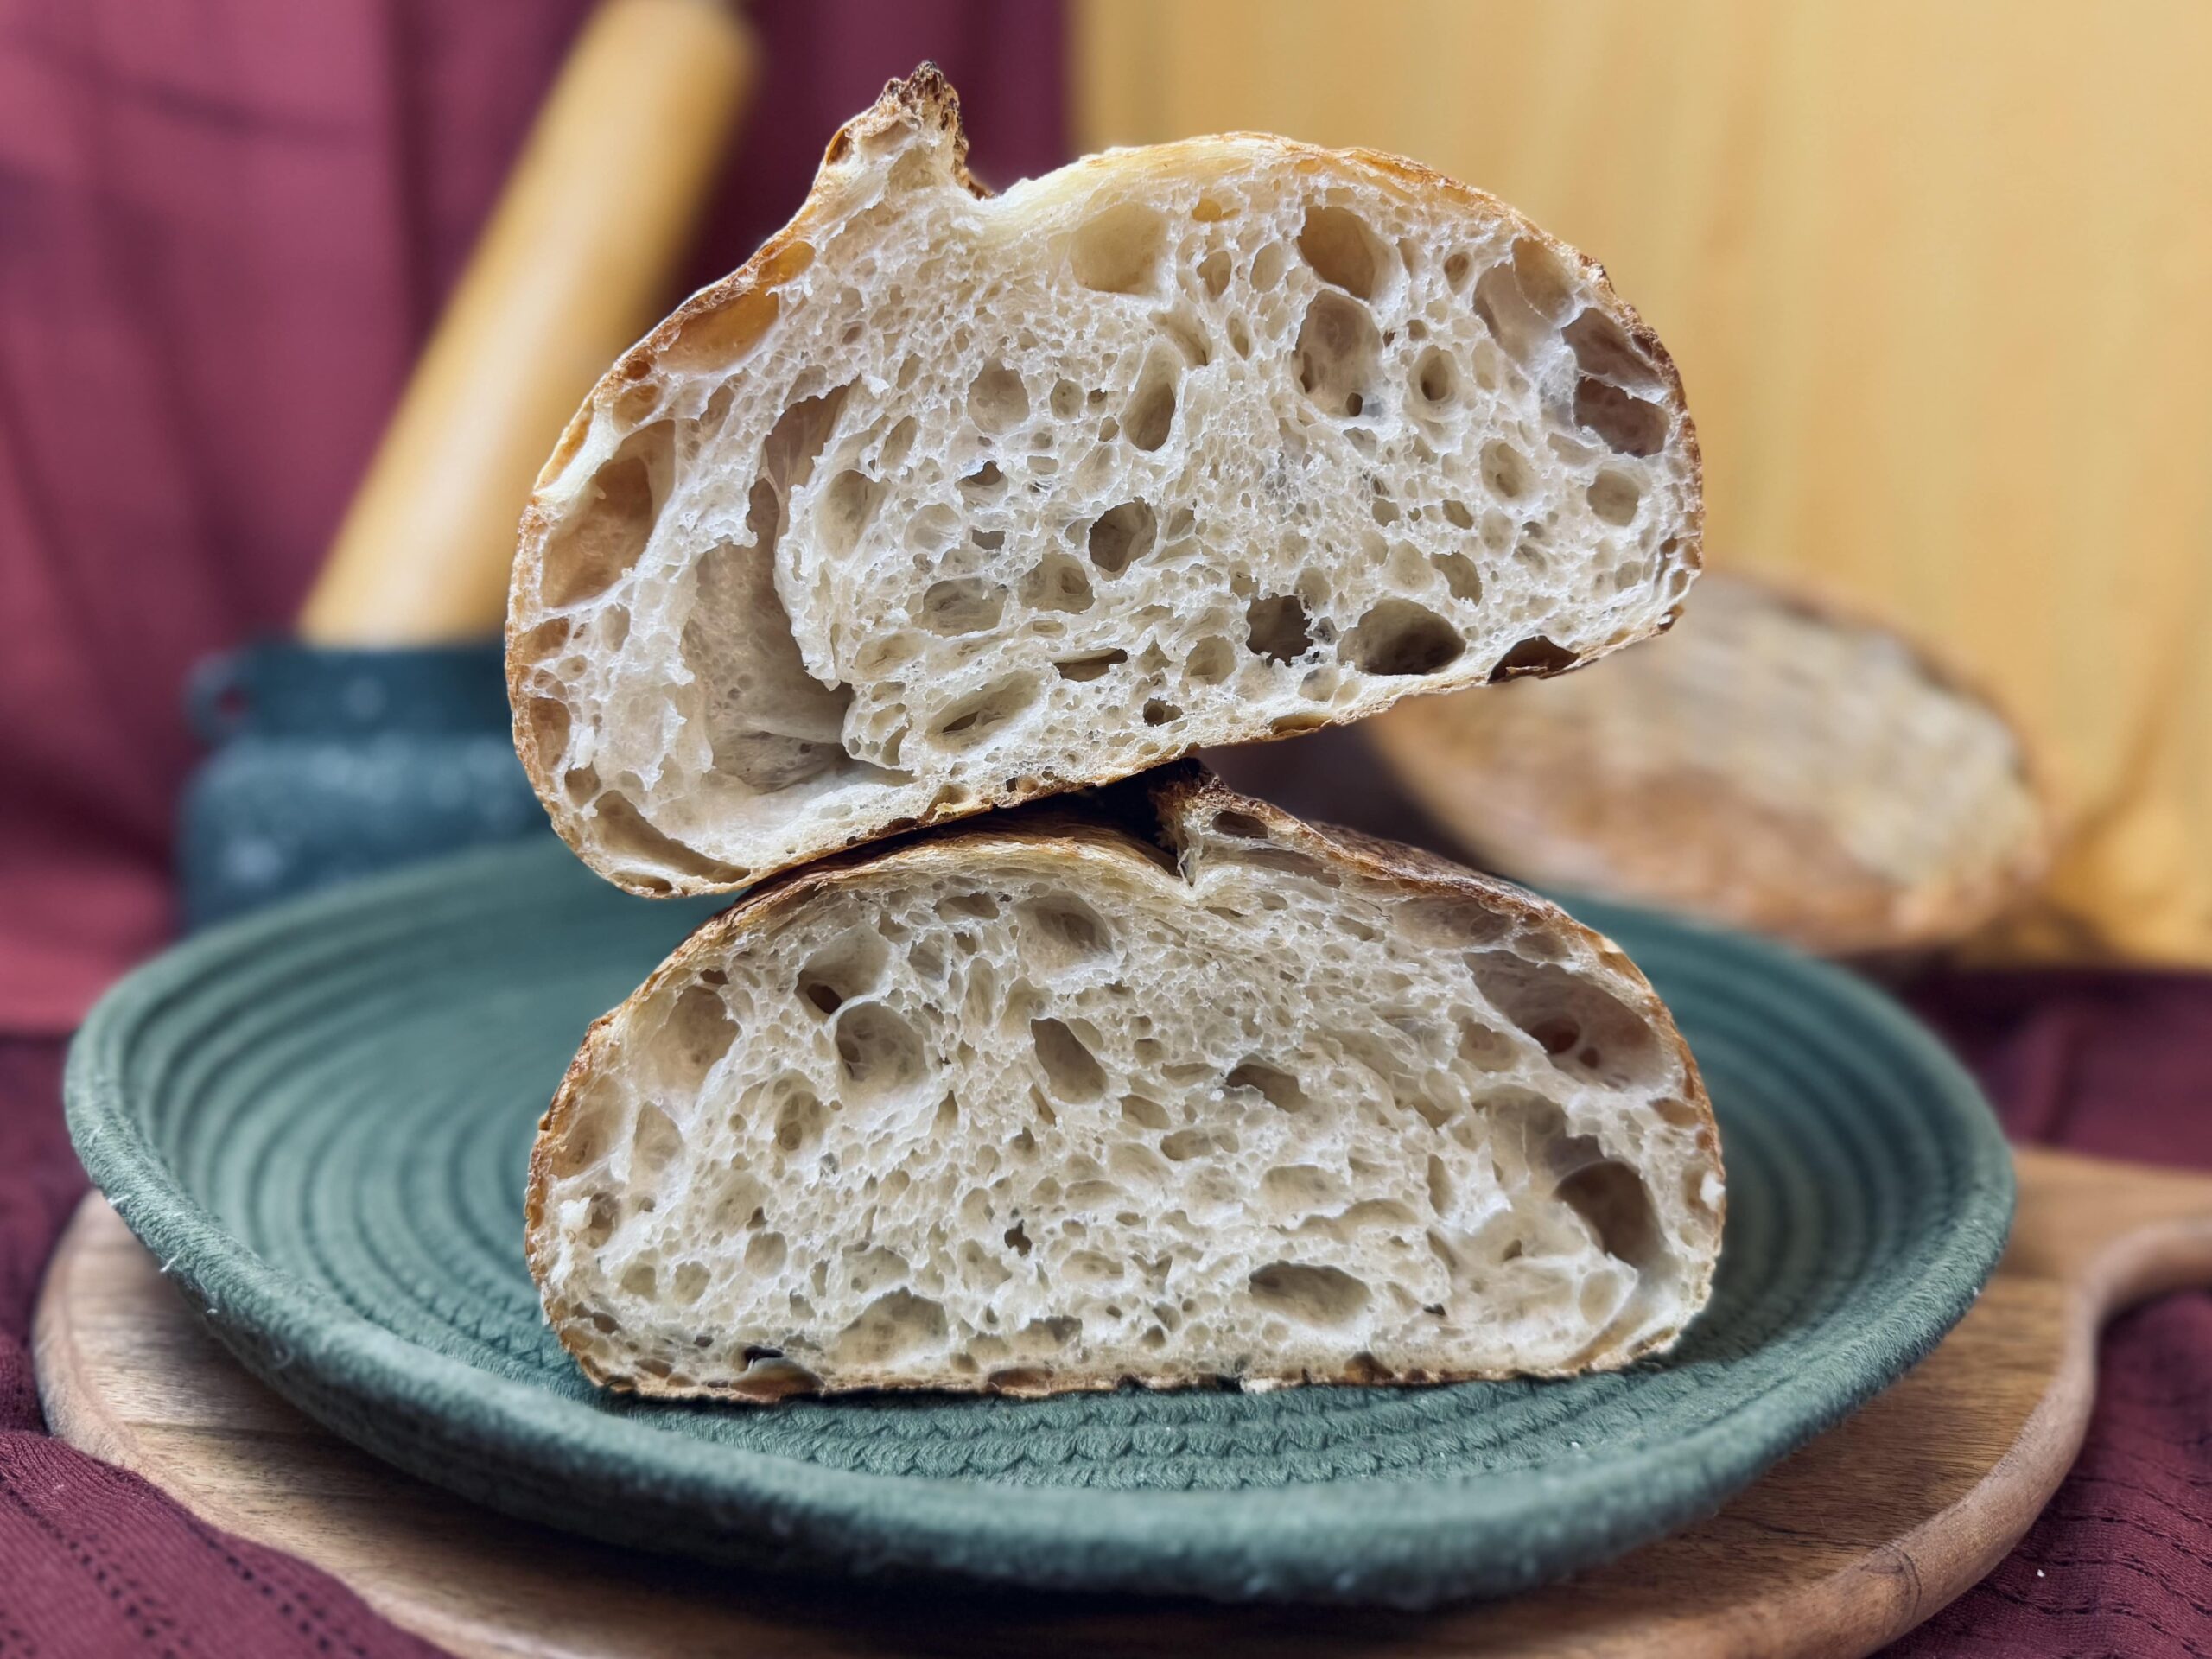
While lactic acid bacteria (LAB) also off-put some CO2, their main contribution is flavor, preservation, and protein degradation. We can tell how strong our yeast are by how quickly the starter rises between feedings, and how high it rises. If our starter is only doubling in size in a twelve-hour period, our yeast are weak. When this is the case, our dough rises sluggishly and we cannot accumulate the amount of gas necessary for strength, leading to a weak rise, dense bread, and closed crumb. Conversely, if our starter is rising five to six times its height in just a few hours, our yeast may be too strong. With yeast that are too strong, the bacteria do not have enough time to do their work. We won’t get the flavors, preservation quality, or protein degradation that makes sourdough bread so tasty, long lasting, and beneficial to sensitive eaters.
Yeast favor temperatures in the upper 70’s. By keeping your starter in the 76-78 F range (25-26 C), you’re favoring yeast reproduction.
Because oxygen is so vital for yeasts’ CO2 production, using a container with a lid that vents is super helpful. The jar should not be sealed all the way.
It’s also helpful to give the starter a stir or two during fermentation if you’re looking to stimulate yeast growth. Just one stir a few hours into fermentation can make a significant difference in the strength of your yeast. When I say stir, what I really mean is one set of folds (stretch-and-folds, like what you would do with your bread dough). While stirring your starter does develop gluten, it also introduces and traps oxygen. Therefore, the starter is not only able to retain more air due to the mildly-stronger gluten network, it is also trapping oxygen, which keeps yeast producing CO2 more abundantly. I like to give my starter one set of folds two to four hours into fermentation.
Last, controlling acidity is a must. If the environment gets too acidic, yeast are suppressed and you’ll notice a decline in how high your starter rises. There are so many ways to control acidity in a sourdough starter, and it all depends on what you are going for in the flavor and texture of your bread. Different kinds of starters encourage different types of acidity. To understand acidity and how to control it, we must first understand our bacteria.
Lactic Acid Bacteria (LAB)
The term “lactic acid bacteria” (LAB) encompasses a wide range of good bacteria that live inside our starters. These bacteria degrade proteins in flour, making it more digestible; lower the pH of bread, making it more shelf-stable by preventing the growth of food borne pathogens; and release lactic and acetic acids, which contribute to the overall flavor of the bread (but also have notable effects on dough quality).
There are two types of LAB, homofermentative and heterofermentative, that contribute various qualities to the starter (which is then relayed to our bread dough).
Homofermentative LAB
Homofermentative LAB produce only lactic acid during the fermentation process. This is because they can ferment only 6-carbon sugars, breaking them down into two 3-carbon pieces, which are then transformed into lactic acid during fermentation. “Homo” means “all the same,” so this is a good way to remember them.
Homofermentative LAB prefer wet and warm environments, particularly temperatures in the lower 90s Fahrenheit (30s Celsius). In favorable conditions, homofermentative LAB reproduce abundantly, which means more lactic acid is produced as sugars are more rapidly fermented. Conversely, in unfavorable conditions (such as in stiffer starters kept at cooler temperatures), they reproduce at a much slower rate, leading to less lactic acid production.
Lactic acid has notable effects on dough quality. Lactic acid production has a direct correlation to protease activity, an enzyme in flour that degrades structure, creating extensibility in your dough. More lactic acid means more protease activity, which means faster dough degradation. When you have too much lactic acid in your starter, this acid load is transferred over to your bread dough. It creates a bread that is inherently weak. While dough degradation happens naturally, and is a good thing to an extent, too much of it means a complete loss of structure, leading to an “over-proofed,” flat loaf of bread that cannot hold its shape or rise tall in the oven. Having too much lactic acid means it is possible for your dough to “over-proof” before it is really fully aerated by your yeast.
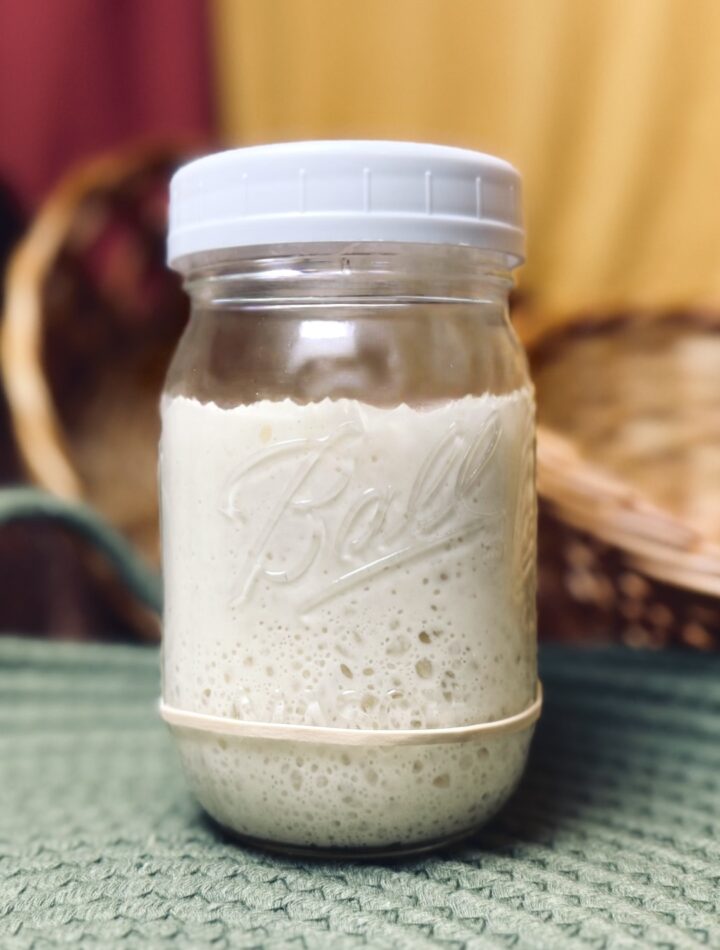
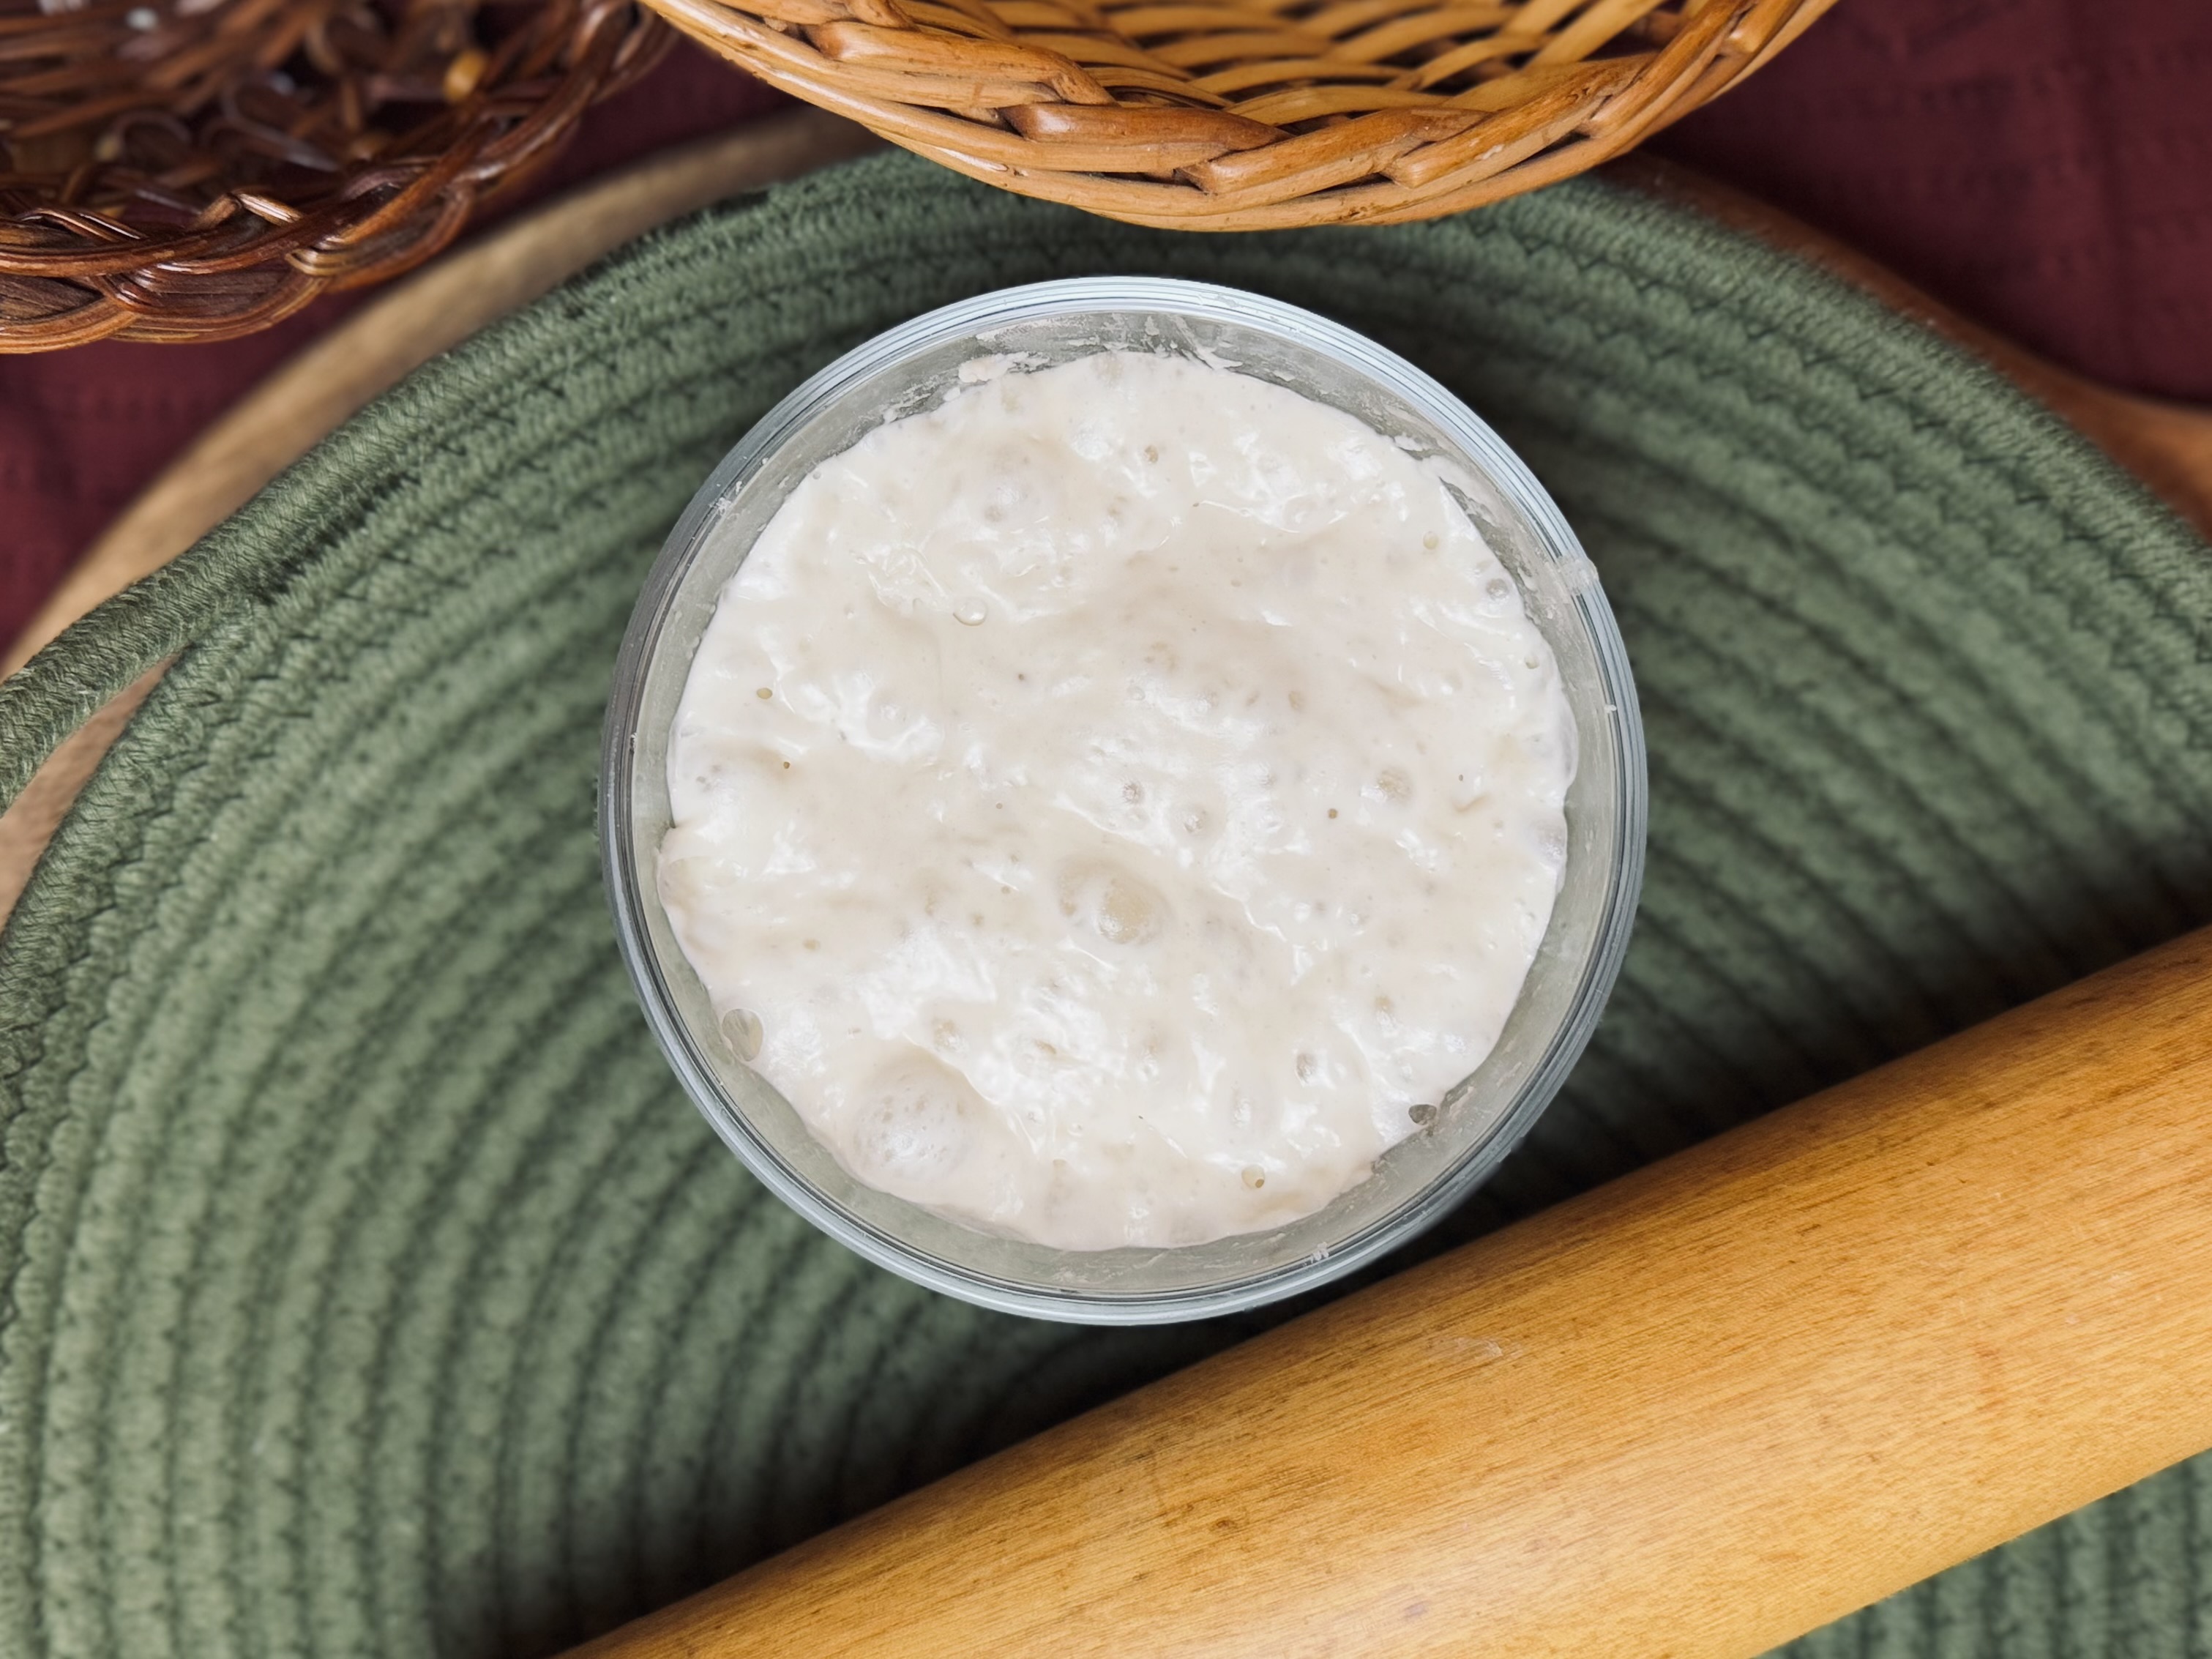
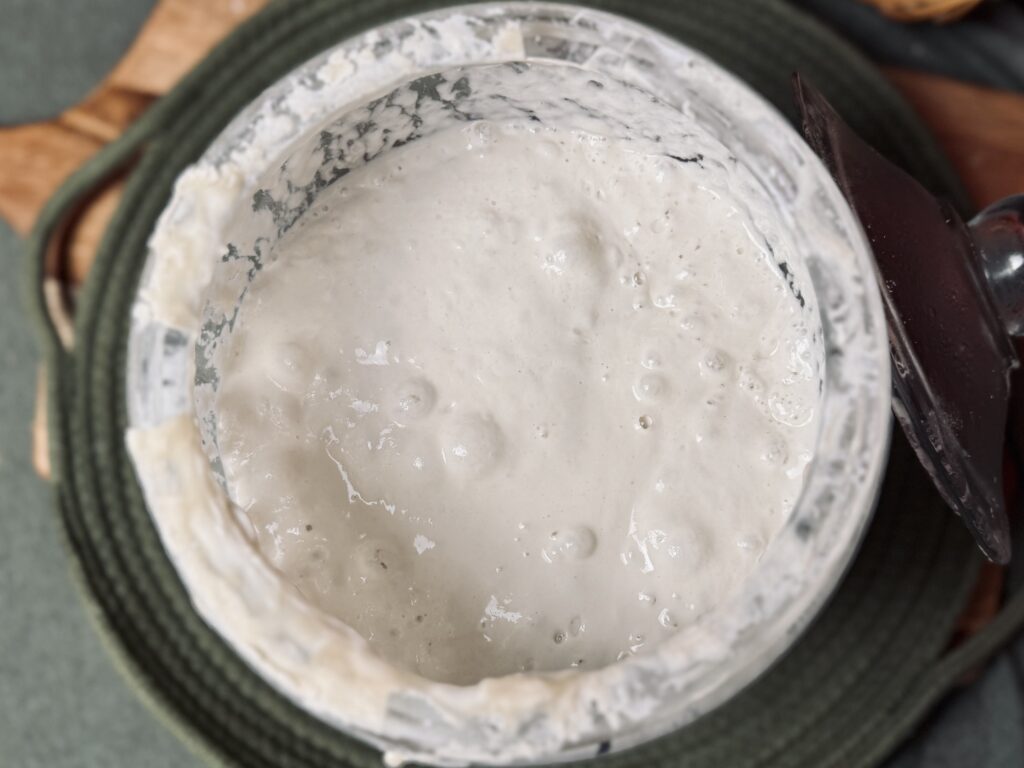
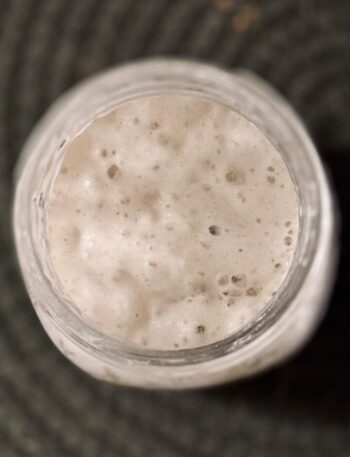
You can tell if your starter has an abundance of lactic acid by the bubbles on the top of your starter. If the bubbles are small, abundant, and “soapy” looking, it is likely this is the case. Lactic acid does not have any smell, but it does have a bitter taste that hits on the back of your tongue, on both the left and right sides. The taste will be present in your starter, as well as any bread baked with it.
Remember that lactic acid production is favored by environments that are wet and warm. This means there will be more lactic acid in a starter kept at 100% hydration in a 78 F (26 C) environment than there will be in a 50% hydration starter kept in a 65 F (18 C) environment. In other words, by raising hydration and temperature, lactic acid production is increased. By decreasing hydration and temperature, lactic acid production is slowed.
Heterofermentative LAB
Heterofermentative LAB (“hetero” meaning “different”) are more complex. They produce lactic acid, CO2, and either ethanol or acetic acid, depending on the environment and the available sugars. There are two types of heterofermentative LAB: obligatory and facultatively.
Obligatory heterofermentative LAB can ferment only 5-carbon sugars. They break these 5-carbon sugars down into 3-carbon and 2-carbon pieces. The 3-carbon piece is transformed into lactic acid during fermentation, while the 2-carbon piece will become either ethanol or acetic acid.
In order for acetic acid to form, another substance must be present. This substance can be a variety of things, but in bread dough, it is usually fructose. Otherwise, the 2-carbon piece is turned into ethanol instead.
Facultatively heterofermentative LAB can break down 5-carbon or 6-carbon sugars, depending on which are available. This means they can function like homofermentative LAB, producing only lactic acid, or like obligatory heterofermentative LAB, producing lactic acid and ethanol or acetic acid.
Just like homofermentative LAB, both strains of heterofermentative LAB prefer wet, warm environments, with temperatures in the lower 90s Fahrenheit (30s Celsius). These favorable conditions encourage the production of lactic acid and ethanol in obligatory heterofermentative LAB and all lactic acid in facultatively heterofermentative LAB. This means that, between all strains of LAB, wet, warm environments favor the production of lactic acid.
In contrast to homofermentative LAB, which produce less lactic acid in cooler environments and drier doughs, these same conditions promote the production of acetic acid for both types of heterofermentative LAB (due to the kinds of sugars available). Bacteria always take the fermentation pathway that generates the most energy within their capabilities and resources, meaning it is most common for heterofermentive LAB to generate acetic acid instead of ethanol whenever possible. By controlling the environment, we can control the type of acids produced during fermentation.
For Advanced Readers: If you’re interested in diving deeper into LAB, and the differences between homofermentative and heterofermentative LAB, I highly recommend this article by Debra Wink, a microbiologist and sourdough baker.
Acetic acid is the opposite of lactic acid; it has notable, but different, effects on dough quality. While lactic acid encourages extensibility, acetic acid creates a strong dough. Again, while this is good in moderation, and necessary to balance the lactic acid, too much of it will create a dough that is too tough, inhibiting fermentation. A thick, tight dough means more air is required to blow it up. A dough that is too strong won’t rise right, and the texture will be denser with a closed crumb.
You can tell if your starter has an abundance of acetic acid by the color and smell. If your starter has taken on a grayish color (this is different from hooch, which is a build-up of ethanol) and smells really pungent, this is likely the case. The taste is less bitter than lactic acid; you can taste it on the tip of your tongue. Some of this acid will be lost during baking, but the taste will still be present in the finished bread.
Think of acetic acid as the counter to lactic acid. While lactic acid is produced in environments that are warmer and wetter, acetic acid is produced in environments that are cooler and drier. While too much of anything will have negative effects, it is good to encourage the production of acetic acid and heterofermentative LAB.

Enzymes
There is one more variable to the equation: enzymes. Enzymes are naturally present within flour but are, essentially, in hibernation until the flour and water are combined. When this happens, enzymes wake up from their sleeping state. Different kinds of enzymes have different responsibilities. One of the most important jobs of enzymes is to break down complex sugars into simple sugars. Yeast feed on these simple sugars, releasing CO2 as they feast and multiply. The main enzyme responsible for this is called, “amylase.”
Slower enzymatic activity means a slower rise, due to the rate at which simple sugars are available for yeast. Store-bought, high extraction flours (white flours with very little bran and germ), contain the least amount of enzymatic activity. Because of this, sometimes enzymes, like malt, have to be added to the blend, otherwise the dough would barely be able to rise. Alternatively, fresh flours containing whole grains have a substantial amount of enzyme activity. This causes fermentation to happen at increased speeds due to the abundance of simple sugars available.
Protease is another important enzyme, one I have already mentioned above. Proteases are responsible for dough degradation. Just like everything else, this is a good thing in balance. Proteases ensure the extensibility needed for our dough rise and expand. Without them, our dough would be too tough, and would fail to rise effectively. Conversely, too much protease activity can lead to a completely demolished gluten structure. Once this happens, the effects are irreversible. In our starter and bread dough, this looks like a bread dough that cannot hold in air or maintain a shape. It’s sloppy, sticky, and can even become “soupy” in extreme conditions.
Remember that lactic acid that we mentioned before? It has a direct correlation to protease activity (better called “proteolytic” activity). Lactic acid speeds up proteolytic activity, meaning that the dough degrades at a faster rate.
Let’s Talk Flour
People all over have very diverse opinions about what kind of flour to use when maintaining a sourdough starter. The truth is: you can use any kind of flour. The catch? Different types of flour influence the activity within your sourdough starter, which in turn affects the kinds of acids produced.
Low-Grade Flour Versus High-Grade Flour
Low-grade flour contains more proteases than high-grade flour. Different parts of the wheat kernel have different amounts of protease, and low-grade flours come from the parts with the most protease.
We already know that protease enzymes begin to break down proteins in the flour as soon as the flour comes in contact with water. This means that low-grade flours are likely to degrade faster than high-grade flours, resulting in a starter that won’t be able to rise as high or maintain peak for as long.
While this isn’t as important in your starter as it is for your bread dough, it should be noted that the characteristics of your starter are always transferred to your bread dough. This means that if you add 100 g of completely degraded starter to a recipe, that’s 100 g of your dough that will never be able to have the strength it needs to hold in air efficiently.
Whole Grain Versus White Flour
Whole grain flours contain more nutrients and enzymes that speed up fermentation. The enzymes, namely amylase, break down sugars more quickly, providing more food for yeasts.
Although the bran and germ provide nutrients, they also cut through the gluten network, making it weaker. While this isn’t the end of the world, it just means your starter won’t be able to rise as high.
Last, whole grains contain a higher mineral (ash) content, which serves as a natural buffer for acid production. This means your LAB can produce more acid before the environment becomes too acidic for them to live in. This is especially helpful if you want bread that is more sour.
Meanwhile, white flour is just the opposite. It is stripped of nutrients and enzymes, resulting in a slower fermentation, and contains minimal ash, limiting acid production and sourness compared to whole grains. This can play to your advantage or disadvantage, depending on your desired maintenance routine.
A Note On Rye
Rye flour is high in pentosans (complex carbohydrates) that influence acid production and gluten formation. If the environment allows, rye flour will encourage more acetic acid than lactic acid production. However, these pentosans also make the starter stickier and weaker, unable to capture air like other flours.
Other than that, the choice between whole/dark or light rye is the same as the choice between whole grain and white flours—the pros and cons of each remaining true.
This means a whole grain rye flour will have a buffer system for acid production, favor acetic acid, and provide nutrients and enzymes that speed up fermentation, while a light rye flour lacks the buffer system and additional nutrients, but still contains pentosans that influence acid production and gluten formation.
My Personal Choice
At this moment in time, I choose to feed my starter with 100% white bread flour. Specifically, I use King Arthur Bread Flour. I feed my starter twice daily, keeping it in a fairly warm environment.
The slower activity compared to other grains plays to my advantage in that I don’t have to worry about feeding my starter more than twice per day. Bread flour also contains less proteases and a stronger gluten network, meaning my starter retains strength, traps air efficiently, and holds a steady peak. Last, using all white flour means less acid, which results in less of a sour flavor.
While this is my personal choice, there is no “right” or “wrong” way. The most important thing is that the starter stays fed. Different bakers may choose different flours depending on their desired maintenance routine and the outcomes they are looking for in their bread.
Creating Balance
Now that you understand the factors at play within your sourdough starter, let us discuss how to maintain it to get the outcomes you might be looking for.
Please note: My position on how to maintain a sourdough starter has changed greatly as I have developed a deeper understanding of my starter’s inner workings and how its health affects my bread. I encourage sourdough bakers to take the health of their starter seriously, that is, if they are aiming for the highest quality of bread. The steps I suggest aren’t always the easiest—they might mean feeding the starter a few times a day and compiling discard, which some people might not like. But if you’re still reading, you probably want to take great care of your starter to bake amazing bread. If that’s not you, don’t worry—I’ll also share some easier ways to take care of a starter, even if they’re not what I’d choose.
What We Need Our Starter To Do
- Produce CO2. For our starter to effectively leaven our bread, we need a strong CO2 output. CO2 is produced mostly by yeast, but also by heterofermentative LAB. Therefore, it is important to gear our starter care toward these microorganisms.
- Have a balanced acid load. All microorganisms (yeast and LAB) are suppressed in environments that become too acidic. Not only this, too much acidity in our sourdough starter will transfer over to our bread dough, affecting fermentation and dough quality.
How To Encourage CO2 Production
Since CO2 is produced mostly by yeast, but also by heterofermentative LAB, we can encourage CO2 production by keeping our starter at a temperature that favors yeast reproduction. Yeast favor temperatures in the upper 70s Fahrenheit (76-78 F; 24-26 C), meaning we can keep our starter around this temperature to encourage their growth.
However, it is not essential to keep your sourdough starter exactly in this temperature range. Yeast grow most rapidly at this temperature, but they will still reproduce in temperatures down in the 60s Fahrenheit (15-20 C), especially in a healthy, established starter. Most commonly, 100% hydration liquid sourdough starters are kept at room temperature for optimal health. I recommend anywhere from 70-78 F (21-26 C) for best results, though you’ll see later why keeping the starter in the middle of this range might be ideal.
Why not favor the reproduction of heterofermentative LAB? Not only do these bacteria reproduce faster than yeast, they thrive at temperatures in the lower 90s F (lower 30s C), which are too high for yeast. In such conditions, LAB can quickly overpopulate, suppressing yeast activity and causing excessive acid production, which can negatively impact bread dough. Although heterofermentative LAB produce CO2, they do so in much smaller amounts compared to yeast. Therefore, it is better to favor yeast, who are the most abundant producers of CO2, to ensure their health. Heterofermentative LAB will still be able to thrive in conditions favorable to yeast, but will not take over the environment or release excessive amounts of acid.
We can also stimulate yeast growth by doing something so simple: giving our starter a set of stretch-and-folds (I usually just say, “a stir”). Just one set of folds one-third of the way into fermentation can make a huge difference in CO2 output. I know it seems contradictory—if we fold the starter, doesn’t that mean it is being deflated? So, how could it possibly rise higher if I do so? Trust me—it works. Yes, you are deflating the starter, especially because you have taken no other measures to create an elastic gluten network. But, you are introducing and trapping oxygen, which is has exponential effects.
You see, the term “fermentation” actually encompasses two processes: respiration and fermentation. Respiration happens in the presence of oxygen. During respiration, lots of CO2 is fabricated; however, no ethanol (which contributes to the flavor of bread) is produced. In the absence of oxygen, fermentation occurs, which produces less CO2, but also ethanol. If you’ve ever smelled your starter right before you fed it and it smelled pleasantly like alcohol, this is a sign of ethanol production. In bread dough, respiration occurs until the oxygen is used up, then fermentation finishes the process. That one stir, one-third of the way into fermentation reintroduces oxygen, encouraging respiration, and, therefore, more CO2.
Summary
To encourage CO2, favor yeast growth by keeping your starter in the 70s Fahrenheit (low to mid 20s C) and consider giving your starter one set of “stretch-and-folds” one-third of the way to fermentation.
How To Balance Acid Load
Acidity is an important part of making bread, and it’s not something to fear. In fact, acidity is the reason some people choose to make sourdough, over commercial yeast bread, in the first place. Lactic and acetic acids give breads their flavor and help keep mold away. Lactic acid also contributes to dough degradation—breaking down proteins—which makes bread more digestible. The problem comes when there is too much acidity. Excessive acidity can disrupt the balance by suppressing all microorganisms, including those responsible for producing the acids in the first place. This imbalance can negatively impact bread dough, leading to undesirable characteristics. The key is moderation—acidity is beneficial, but only in the right amounts.
Because LAB reproduce faster than yeast, especially in desirable environments, it is easy for them to take over the environment. We need to find ways to keep the LAB and their acid production in check.
Your starter might be too acidic if:
- It’s only doubling in size (in really bad condition, it may not even fully double)
- The bubbles at the top are small, abundant, and “soapy” looking
- The starter is runny; you can pour it into your mixing bowl (like a loose liquid)
- It has taken on a grey-ish color
- It smells strongly of vinegar, rather than mildly of alcohol
- The starter is passed peak; it has risen to its maximum height and then fallen again
- The pH is less than 3.8
This is likely to occur when:
- The starter is kept too warm or cold
- The starter is underfed
- Acidity is not diluted during feeding (i.e. feeding a 1:1:1 ratio instead of a 1:5:5 ratio)
The simplest, most important thing you can do to fix built-up acidity is to just feed your starter! Particularly, feed your starter at a higher ratio (1:5:5 or higher) in order to dilute the amount of acidity you transfer over from one batch of starter to the next. You may need to feed it multiple times before it comes back to life.
The key to fixing an acidic sourdough starter and keeping acid load in check is simply to favor yeast growth over bacterial reproduction. This means that by doing the exact same things I mentioned before (keeping your starter in the 70s Fahrenheit / mid-20s Celsius and stirring the starter) you are also helping to keep acidity in check. Particularly, by keeping your stater in the mid to upper 70s Fahrenheit (73-78 F; 23-26 C), you are forced to feed your starter at a higher ratio (above 1:5:5) so that it does not peak so quickly. This plays to your advantage by diluting transferred acidity with each feeding.
Other ways to reduce or limit acidity include:
- Lower the hydration. LAB favor wet environments, so by reducing the hydration we can also reduce acidity.
- Add a little bit of sugar. Adding 10-15% sugar creates something called “osmotic stress,” which hinders bacteria’s ability to reproduce rapidly, thereby reducing acidity. This technique is used in sweet stiff starter. I usually only use sugar as a treatment, and do not add it to my starter regularly.
- Add a little bit of egg yolk. Egg yolks are great for managing acidity and are commonly used in starters like the Pasta Madre. Adding up to 10% egg yolk helps balance your starter by absorbing and reducing excess acidity.
- Feed it at peak, not over. Once a starter has passed peak, acidity begins accumulating rapidly. It’s best to feed the starter before it has dropped in order to keep it in top shape. (Conversely, make sure you do not overfeed your starter by feeding the starter when it is still domed on top.)
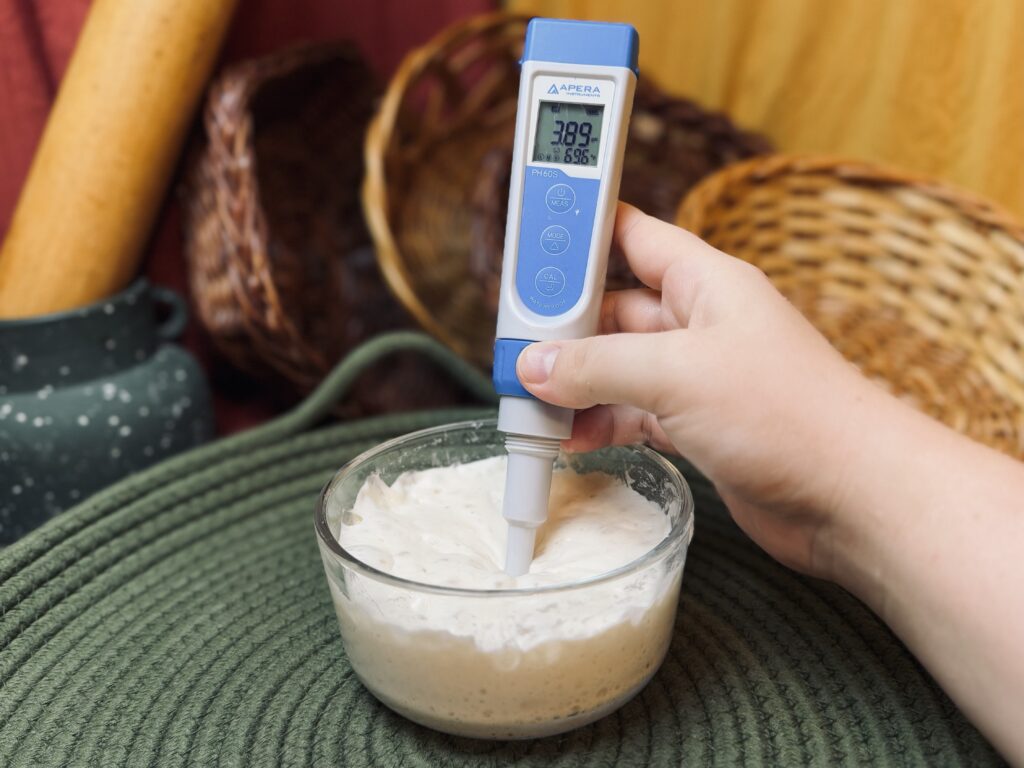
- If using a pH meter to track acidity, try not to let the pH drop below 3.8 before a feeding.
You’ll know your starter has regained itself when it is tripling or quadrupling in size between feedings, is very active and bubbly, smells mildly of alcohol (not overbearing) instead of vinegar or cheese, has a strong structure (must be scooped rather than poured like a liquid), and has a pH reading between 3.8-4.0 when the starter is at peak.
What We Might Want Our Starter To Do (And How To Do It)
If we want our starter to produce bread that is not sour…
Avoid the refrigerator, maintaining the starter in temperatures above 65 F (18 C), but preferably near the mid-70s F (24 C) to favor a strong yeast population and ability to dilute acidity from feeding to feeding. Feed high ratios (above 1:5:5) twice daily and keep the pH between 3.8-4.0. It can also be helpful to lower the hydration of your starter just a tad. A 70-85% hydration starter is still easy to manage and feed, while also working to keep acidity under control.
If we want our starter to produce bread that is sour…
The trick here is to get the flavors of the acids we desire, while still maintaining balance and helping our colonies thrive. For this, you’ll want to choose a flour with a higher mineral (ash) content, i.e. a whole grain flour, to include in your starter feedings. The high ash content serves as a natural buffer system, allowing for more acid production before the environment becomes too acidic for your microorganisms.
If we want our starter to produce a bread with sharp, vinegary notes…
We need to favor the production of acetic acid. To do this, keep your starter at a lower hydration, and in cooler temperatures. A stiff starter is ideal, 50-65%, kept at a temperature warm enough for yeast to maintain activity but cool enough that you only have to feed the starter once per day, around 60-65 F (16-18 C). Grains that readily supply pentosans, such as rye, can also encourage acetic acid production.
If we want our starter to produce a bread with mild, yogurt notes…
We need to favor the production of lactic acid. Keep the hydration of the starter at 100%, or you can go higher (up to 500%), though I’ve never ventured this far. Beware of too much lactic acid production and its effects on bread dough. Keep the starter warm, in the 70s Fahrenheit (mid-20s Celsius) and feed it at least twice daily.
If we need our starter to ferment a bread with a weak, low-grade flour…
We need to favor the production of acetic acid to add strength/toughness to the dough. Low-grade flour already has increased protease activity, which lactic acid will only speed up, potentially harming our dough. For this, keep a stiff starter, around 50% hydration. The routine you choose is up to you, although I recommend a twice-daily feeding schedule that favors yeast growth.
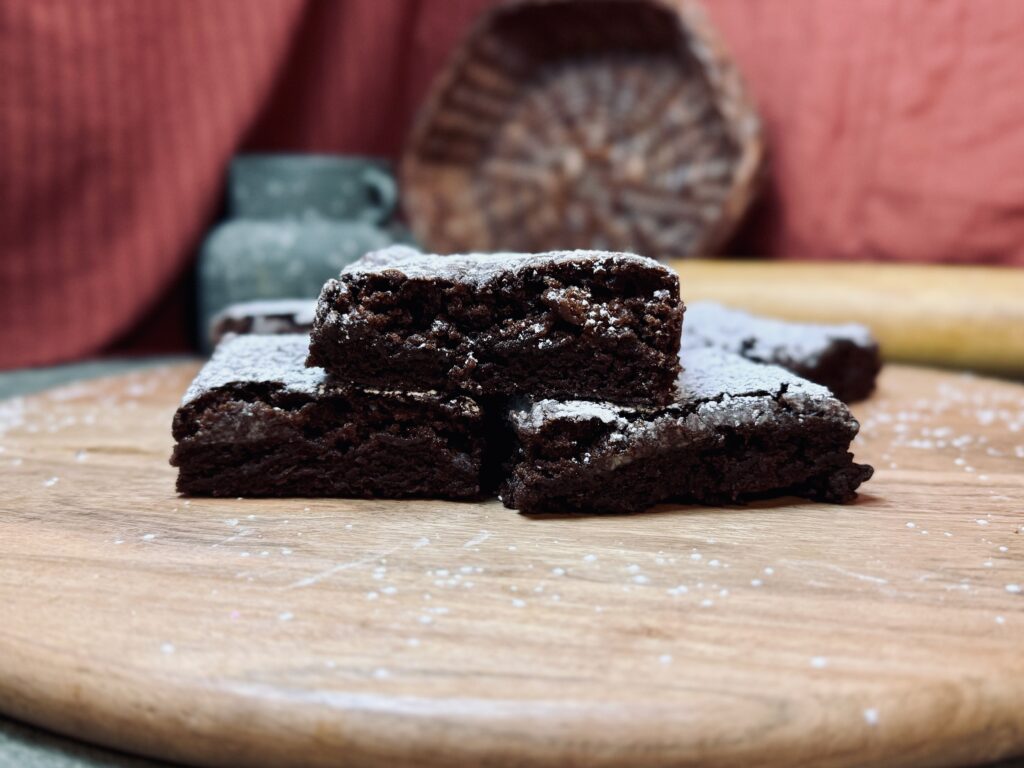
If we want our starter to produce a light and airy bread…
We need to encourage vigorous activity by maintaining a daily feeding schedule and favoring yeast growth.
If we are okay with our starter producing a dense bread with a tough chew…
We don’t have to be as strict with our feeding schedule or acid control. A starter with lots of acid, whether lactic or acetic, or a starter with a weak yeast population will not be able to ferment as effectively.
How I Maintain My Sourdough Starter
My sourdough starter maintenance routine is geared toward a strong yeast population with limited acidity. Since I bake regularly, I follow a twice-daily feeding routine. Here’s what it looks like:
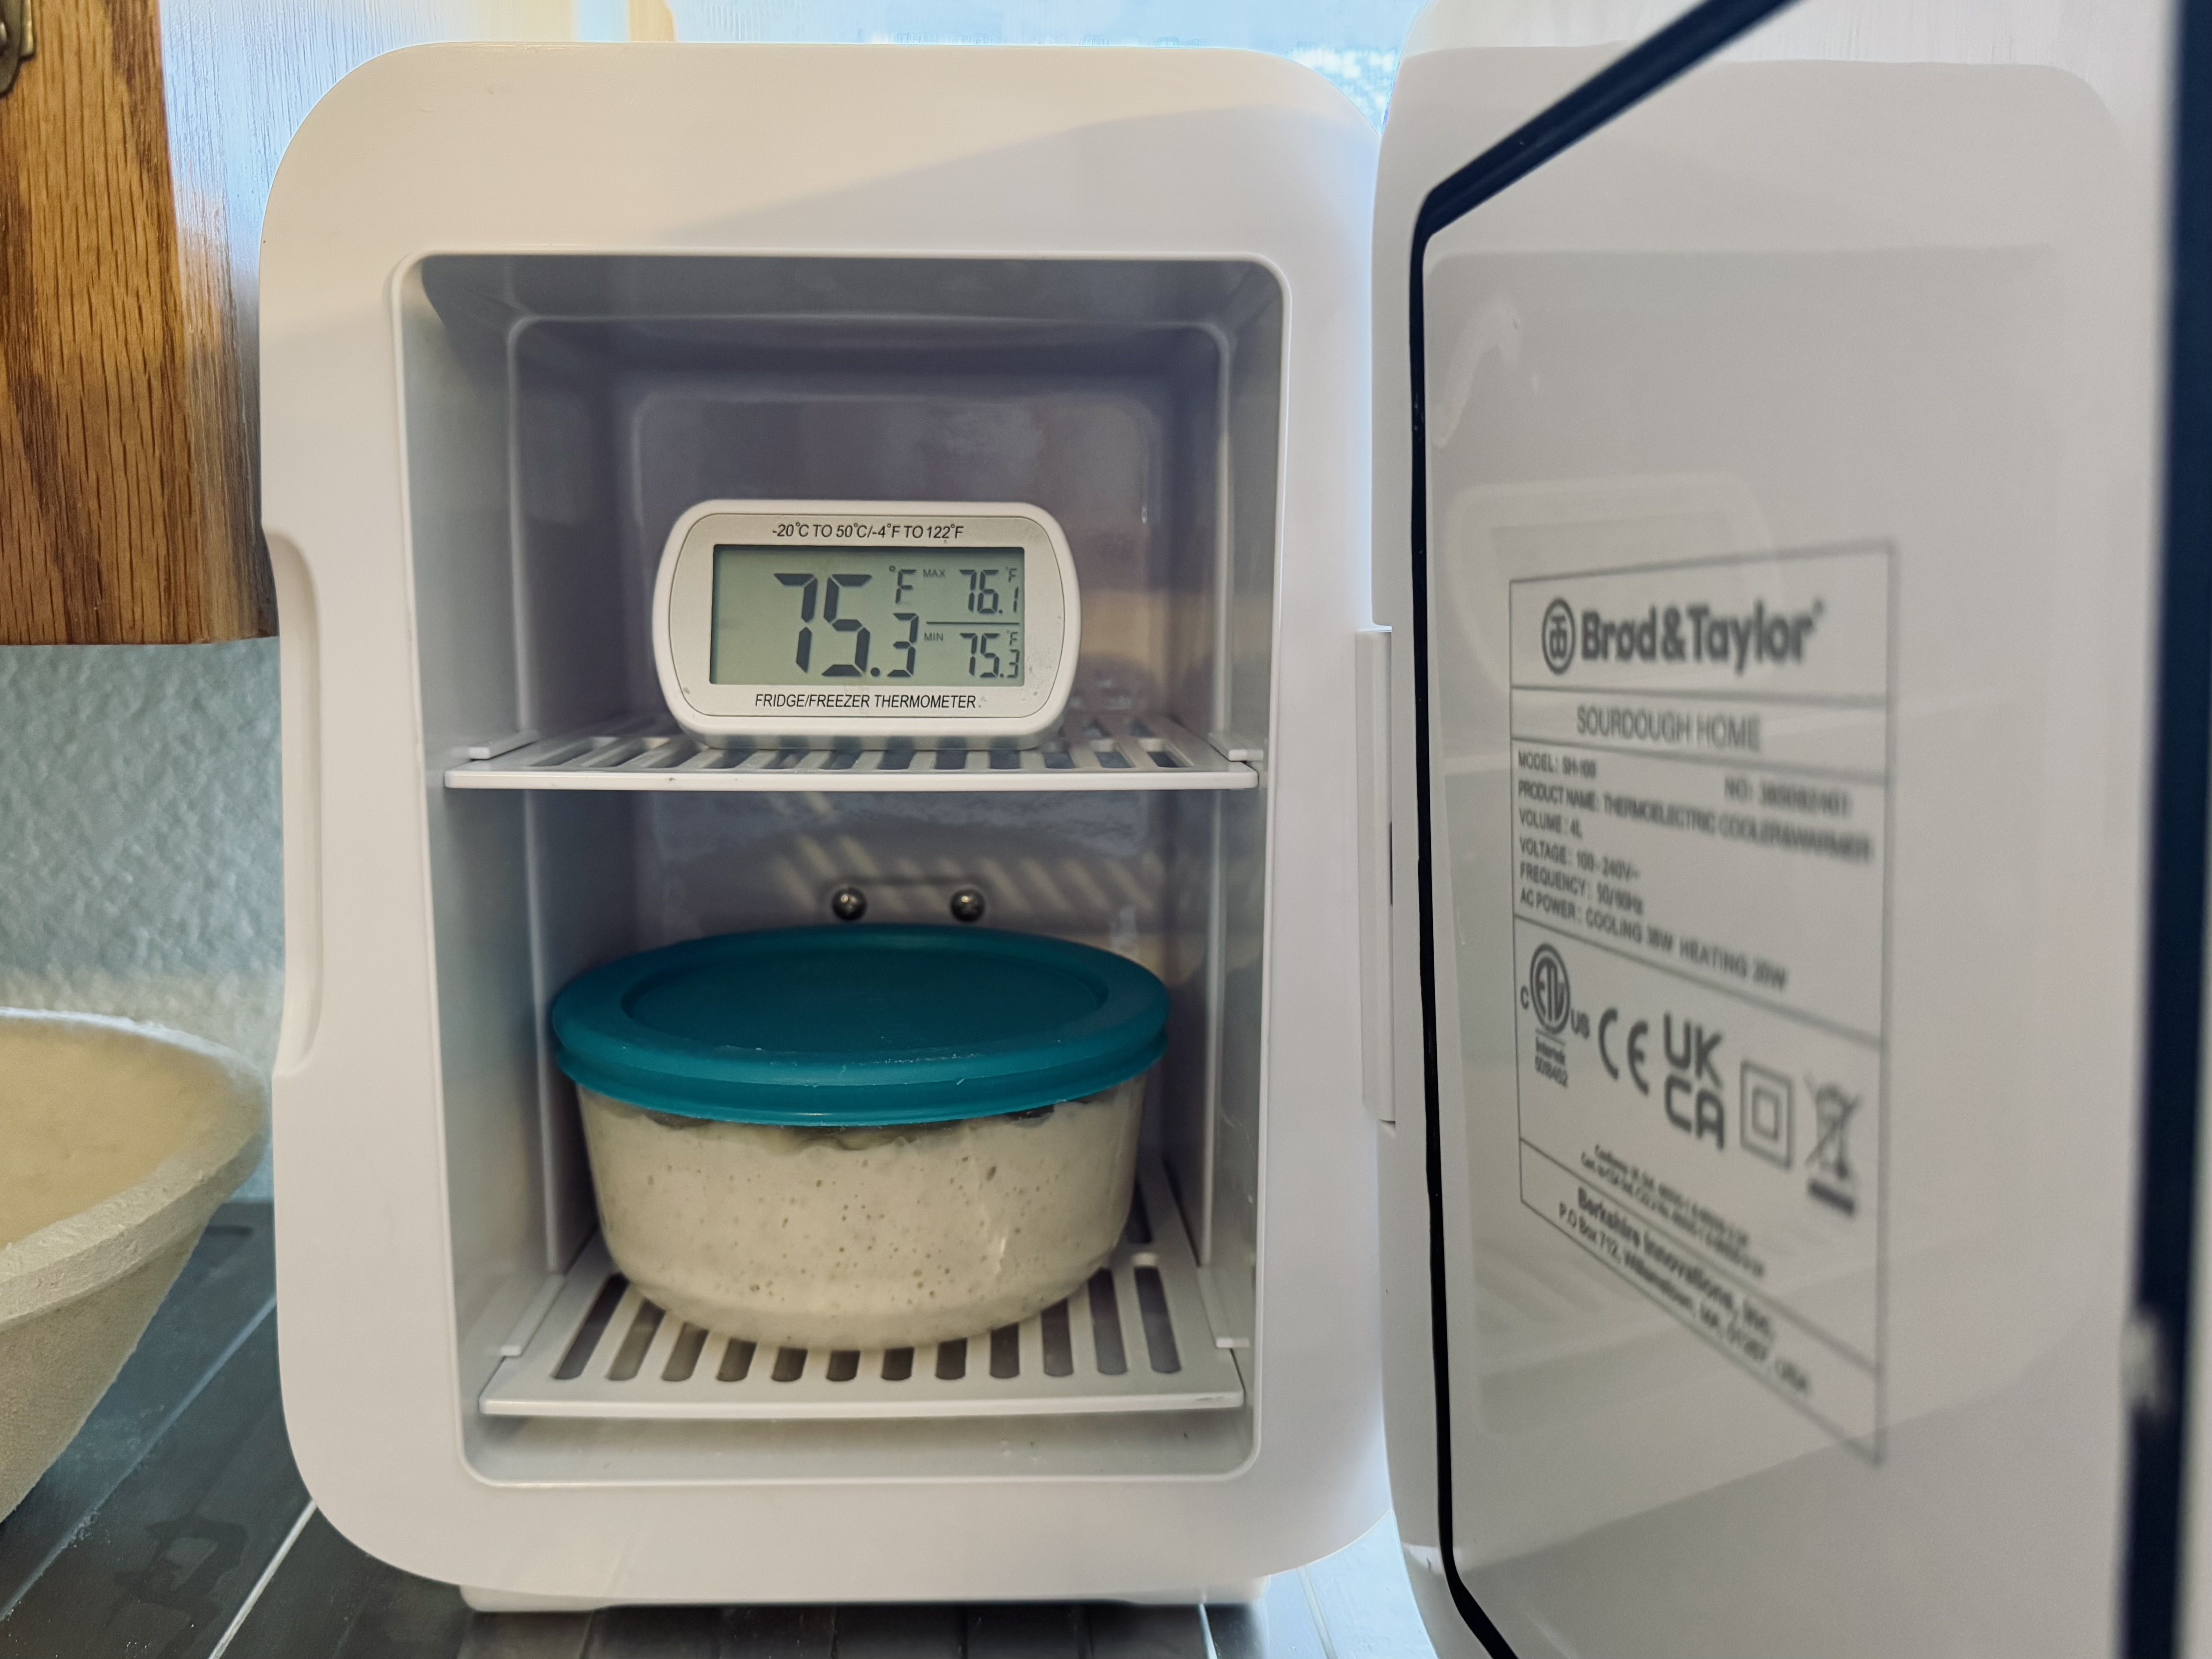
In the morning, usually around 8:00 AM, I take my sourdough starter out of my Brod and Taylor Sourdough Home. I check the height risen, the pH, and the temperature inside the B&T Sourdough Home.
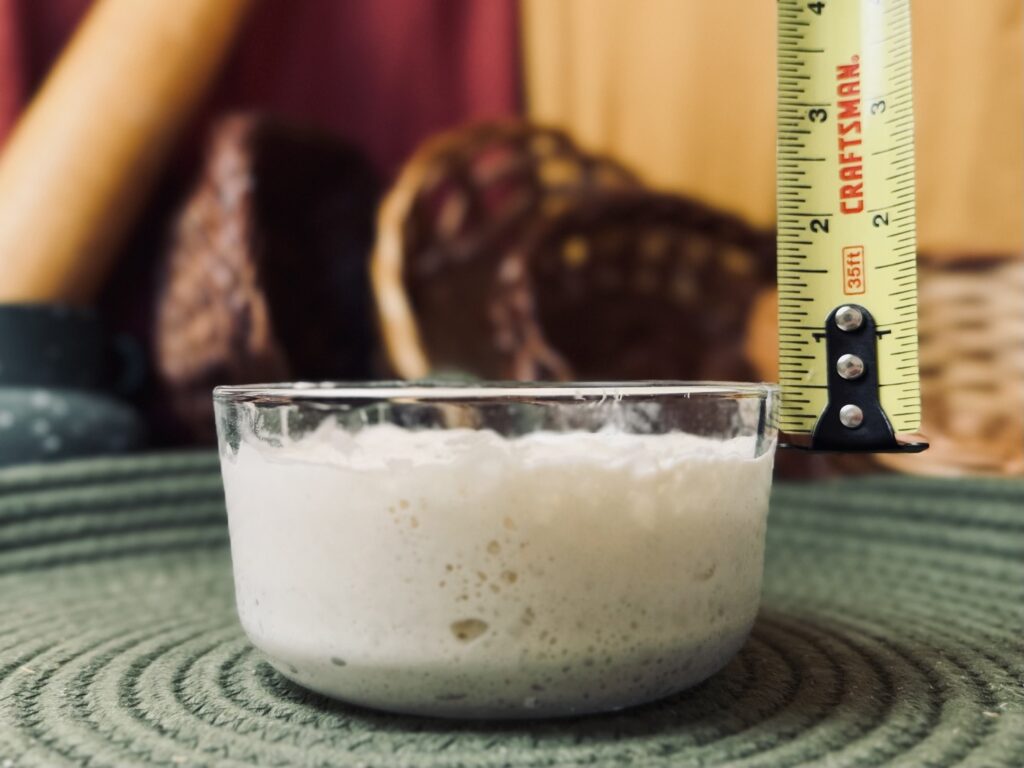
To check the height risen: I use a consistent feeding ratio which perfectly fills up a 2-cup Pyrex storage container. The height of the starter should be no less than one-half inch from the top of the container. Ideally, the starter has risen high enough that some of it is stuck to the lid. This tells me that my starter is ready to use. If it has risen less than this amount, I will not use it for bread as it will only cause issues in my dough.
To check the pH: I use my Apera Instruments pH meter, which I calibrate regularly, to check the pH. First, I dip the pH meter into lukewarm water, then into my starter. I check the pH in multiple parts of the starter, just to be sure. The pH should be between 3.8-4.0. If the pH is above 4.0, it can ferment for longer. If the pH is below 3.8, I will not use the starter for bread (and I will make sure to dilute the acidity when I feed the starter). Ideally, the pH is around 3.88 to 3.90 at the time of feeding.
To check the temperature inside the B&T Sourdough Home: I keep a thermometer inside the B&T Sourdough Home, which tells me actual min and max temperatures inside the Home during the twelve hours it was fermenting (sometimes the B&T Sourdough Home can be a few degrees off from the temperature it is set at). This helps me know if my starter might have gotten colder or warmer than I was expecting, and helps me know when to make adjustments to the settings on the Home.
Next, I grab a new Pyrex container and add 50 grams of lukewarm water and 60 g of King Arthur Bread Flour to the container. If everything is on track with my sourdough starter, I add approximately 10 g of sourdough starter to the new container. If my starter hasn’t risen appropriately, I might add 15 g of starter.
After adding all the ingredients to my Pyrex container, I mix the starter well with a spoon and replace the lid. The starter then resides in my B&T Sourdough Home until the next feeding, which is maintained at 73-75 F (23-24 C).
Two to four hours after I have mixed my starter, depending on the day, I will remove my starter from the B&T Sourdough Home and give it one set of stretch-and-folds with a spoon. Some days, if I’m feeling ambitious, I will give my starter a “stir” at two hours and at four hours.
In the evening, approximately 8 PM, I will repeat the process as described above. Usually I will “stir” my starter again right before I go to bed, which is usually around 10 PM.
If You’re Not As Ambitious As Me…
That’s okay. I get it. Not everyone wants to feed their starter twice daily. You can keep your starter in the refrigerator in between uses, or just when you need a break. When you are ready to use it, you’ll want to give your starter at least two to three feedings to refresh it. Look for the signs mentioned above to know when it can best be used for bread.
If your starter has been in the refrigerator for a very long time and is very thin and runny (acidic), you may need to feed it for a week or two before you use it, in order to bring it back to life. Again, look for the signs mentioned above to know when it is ready to use.
I do not encourage a no-discard method or feeding your starter only once after removing from the refrigerator before using it for bread. I know this makes life easier, and seems to make sourdough way more flexible. However, these kinds of practices encourage acidity and limited CO2 production, which will hinder your dough’s fermentation abilities (producing denser bread). The quality of bread you are capable of producing is directly related to how you care for your starter.
What Do You Do With The Remaining Starter?
Well, fortunately, I am a recipe developer, so I make bread often. Depending on the bread I am making, I may use the remaining starter to start bread in the morning, the night, or both. If I don’t feel like making bread, I pile the remaining starter into a container and use it to develop my discard recipes.
My discard recipes are made to use a lot of discard (at least, as much as possible for the given recipe). If you don’t make bread regularly, but want to keep a twice-daily feeding schedule like mine, try making a discard recipe that uses several cups of discard at least twice weekly. Then, you won’t have anything to worry about.
Frequently Asked Questions (And Answers)
Does the flour I use to feed my starter affect the taste of the bread?
Yes, definitely. Not only does flour type affect the type of acids produced (influencing flavor development in your bread), the flour itself will become a part of your bread recipe.
Is it okay to use all-purpose flour for feeds when I use bread flour for baking?
You can use whatever kind of flour you want for feeds. The biggest difference between all-purpose flour and bread flour is the strength of the flour and protease activity. I recommend bread flour for the qualities it will transfer over to your bread dough; however, using all-purpose flour for feeds is just fine.
Do you recommend adding rye? If so, how much per feeding?
I recommend adding rye as a treatment, but I do not, personally, add rye to my feedings. Rye will increase activity and favor acetic acid production. You can replace up to 30% of white flour with rye flour in your daily feeding routine, depending on your personal preference.
My starter barely rises with all-purpose flour; I have to use whole wheat for it to rise 2-3X. Why?
Whole wheat flour contains more nutrients for your microorganisms, which promotes a more vigorous fermentation. This is a sign that your starter is very sluggish and needs treatment at room temperature for a week or two.
What ratio to feed once per day, to prevent it from peaking too early?
For this, I recommend a stiff starter kept around 65 F. I have never done once-daily feedings, so I do not know the exact ratio. I would start at a 1:10:5 ratio (starter:flour:water) and adjust from there.
I’m leaving on a trip for 3 weeks, what can I do with my starter?
Definitely store your starter in the fridge. Refresh your starter on the counter a few times before using.
My starter has a grey-ish liquid on top and is not stretchy, very pasty?
The grey-ish liquid is called “hooch,” which is a build-up of ethanol released by your microorganisms, mostly yeast. This just means your starter is very hungry; it has used up the food source and the yeast have quit producing CO2 altogether, only ethanol. The pasty consistency is because proteases have completely broken down the structure; there is likely a build-up of acid as well. This is a very unhealthy starter that definitely needs a couple weeks of counter feedings favoring yeast growth to bring it back to life.
Can I use discard to start a new batch of starter?
Absolutely! Discard is just unfed starter, so it will come back to life just the same as any sick starter. Feed the discard routinely at room temperature favoring yeast growth. It should come back to life in a week or two.
How long can you keep starter in the fridge?
Starter can last in the refrigerator for a very long time. The longest starter I know of that has been revived was in the refrigerator for a year. Just know that the longer the starter is in the fridge, the longer it will take to revive for optimal use. The only reason you would have to throw your starter away would be because of the growth of mold.
How do I keep my starter’s home clean and not crusty?
I, personally, rotate between two to three containers for my feeds, meaning I use a clean jar with every feed. With this routine, my starter’s home never gets crusty. However, a once-a-week, or even once-a-month jar rotation will suffice. The “crusty” is only dried starter and should not cause any harm.
How often do you clean your jar?
I rotate my jar with each feeding, so twice daily.
How do you maintain when you cannot bake every week?
It is okay to leave your starter in the refrigerator to give yourself a break from feedings. However, if you can manage, I do recommend continuing to feed your starter twice daily even if you do not bake every week. If you cannot do this, The Brod and Taylor Sourdough Home is an option that will allow you to keep your starter at cooler temperatures (still warm enough for yeast activity) for more limited feedings (such as once every two to three days).
How do you keep a little starter? What’s the ratio?
Let’s assume we are keeping a 100% hydration starter and we want to dilute acidity between feedings by keeping it at a 1:5:5 ratio. For this, I recommend 5 grams of starter to 25 grams of flour to 25 grams of water.
If you want to keep the standard 1:1:1 ratio (which does not dilute acidity), you can feed 5 g of starter with 5 g of flour and 5 g of water.
Best weekly feeding ratio for a starter kept in the fridge, bake only once a week.
For this, I will recommend the “no discard” method; however, always watch your starter. If the starter is not rising as high as it should, give it a few more feedings at room temperature to be sure it is ready for bread.
For this method, keep only scrapings in your jar (which is stored in the refrigerator between bakes). The night or morning before you plan to bake, take the jar out of the fridge. Add flour and water to the jar based on whatever you need for your recipe. Let it rest for 12 hours on the counter (preferably above 70 F/21 C) before adding to your bread dough. Repeat weekly.
My starter doesn’t seem to double. I keep it in the fridge between feedings. Is it my flour?
It’s actually, likely, the fridge. The temperature of the refrigerator is too low for yeast to stay active, so they don’t. During the time in the fridge, bacteria continue to work, producing acid in the process (more-so acetic acid with a refrigerator routine). Over time, your starter progressively becomes weaker as all microorganisms are suppressed by the acid buildup. In addition, your yeast are sluggish because they’ve been maintained in temperatures that are too cold.
What if my starter starts to smell “off”?
It depends on the “off” smell. Smells indicative of vinegar or sharp cheddar cheese indicate an excess of acetic acid. Smells indicative of yogurt or mild cheddar may be indicate an excess of lactic acid. Very strong alcohol smells indicate your yeast are producing more ethanol than CO2, due to a lack of oxygen. For other smells, observe your starter and check for mold. Feed routinely to bring it back to life.
I’ve had it in the fridge for two months, can it be saved?
Of course! Your starter will just need routine feedings on the counter favoring yeast growth for a week or two.


Hi, this article was so so so useful for me. I am beginner in sourdough journey in a country where is not this bread routine.
Your blog and your page and of course you yourself can help me.
Tnx alot.
Thank you for the kind words! I am so glad you found this information helpful. Best to you and your sourdough journey!
Hi Caitlin,
Great article. Just what I’ve been looking for for a few weeks. Fabulous tips, especially problem-solving around weak flour.
Thanks so much!
Thank you for the kind words! I’m so glad this article was helpful for you.
Super useful! If I wanted to try the sugar treatment for my acidic starter, how many feeds would you recommend that treatment for?
You only need to use it once or twice, but it does not hurt your starter, meaning you could do it as often as every feeding if you wanted to.